Quản lý vận hành

Các bài viết liên quan đến quản lý hoạt động liên quan tới PostgreSQL

Toàn tập về pg_hint_plan

1. Pg_hint_plan là gì?

Pg_hint_plan là một công cụ dùng để quản lý , điều khiển các kế hoạch thực thi câu lệnh SQL bằng cách sử dụng định dạng '/*+' và '*/' này đặt trước câu lệnh SQL. Nhờ đó mà ta có thể quyết định câu lệnh SQL được thực thi với kế hoạch tối ưu nhằm cải thiện tốc độ xử lý của SQL.

2. Qúa trình thực hiện một câu lệnh SQL:

3. Cài đặt pg_hint_plan:

Các version pg_hint_plan bạn có thể tải tại đây https://github.com/ossc-db/pg_hint_plan/releases

tar xfz pg_hint_plan-REL12_1_3_7.tar.gz
 cd pg_hint_plan-REL12_1_3_7
make
make install

 
Cấu hình pg_hint_plan vào file config postgresql
$ vi $PGDATA/postgresql.conf
shared_preload_libraries = 'pg_hint_plan'
Ngoài ra bạn có thêm các thuộc tính sau vào file config postgresql:
pg_hint_plan.enable_hint = on : bật hay tắt pg_hint_plan
pg_hint_plan.enable_hint_table = on : bật hay tắt pg_hint_pl``an cho bảng
pg_hint_plan.debug_print = on : bật hay tắt chế độ debug
`pg_hint_plan.message_level = log` bật hay tắt chế độ lưu log
 
`pg_ctl restart -D $PGDATA`
`test2=# create extension pg_hint_plan;`
`CREATE EXTENSION`

4. Testing và sử dụng pg_hint_plan

create table t1 (c1 int, c2 int, c3 int, dummy char(100));
create index t1_idx1 on t1 (c1, c2, c3);
create index t1_idx2 on t1 (c2, c3);
create index t1_idx3 on t1 (c3);
create index t1_idx4 on t1 (c1);

create table t2 (c1 int, c2 int, c3 int, dummy char(100));
create index t2_idx1 on t2 (c1, c2, c3);
create index t2_idx2 on t2 (c2, c3);
create index t2_idx3 on t2 (c3);

create table t3 (c1 int, c2 int, c3 int, dummy char(100));
create index t3_idx1 on t3 (c1, c2, c3);
create index t3_idx2 on t3 (c2, c3);
create index t3_idx3 on t3 (c3);
 
insert into t1 select 1, mod(c1,100), mod(c1,1000), 'dummy' from generate_series(1,100000) c1;
insert into t2 select 1, mod(c1,100), mod(c1,1000), 'dummy' from generate_series(1,10000) c1;
insert into t3 select 1, mod(c1,100), mod(c1,1000), 'dummy' from generate_series(1,100) c1;

/*+ IndexScan(t1 t1_idx1) */ explain analyze select * from t1 where c1=1 and c2=10 and c3=100

 
/*+ IndexScan(t1 t1_idx4) */ explain analyze select * from t1 where c1=1 and c2=10 and c3=100

 
/*+ Leading(c b a) NestLoop(c b) HashJoin(c b a) */ explain analyze select a.*, b.*, c.* from t1 a, t2 b, t3 c where a.c1=b.c1 and a.c2=b.c2 and a.c3=b.c3 and b.c1=c.c1 and b.c2=c.c2 and b.c3=c.c3

 
/*+ Leading(a b c) HashJoin(a b) NestLoop(a b c) */ explain analyze select a.*, b.*, c.* from t1 a, t2 b, t3 c where a.c1=b.c1 and a.c2=b.c2 and a.c3=b.c3 and b.c1=c.c1 and b.c2=c.c2 and b.c3=c.c3

 
INSERT INTO hint_plan.hints(norm_query_string, application_name, hints) VALUES ( 'explain analyze select * from t1 t where c1=?;', '', 'SeqScan(t)' );
select * from hint_plan.hints;
explain analyze select * from t1 t where c1=10;

Hoặc có thể đặt pg_hint_plan vào trong câu lệnh SQL

5. Tìm hiểu thêm về các phương pháp truy xuất dự liệu

Phương pháp scan Giải thích
SeqScan(table) Truy xuất theo thứ tự trên bảng
TidScan(table) Truy xuất TID(Tuple ID0 trên bảng
IndexScan(table[ index...]) Truy xuất dựa theo index
IndexOnlyScan(table[ index...]) Chỉ truy xuất dựa theo index mà không truy cập table
BitmapScan(table[ index...]) Chỉ truy xuất dựa theo Bitmap
IndexScanRegexp(table[ POSIX Regexp...]) Truy xuất chỉ mục dựa theo các mẫu Regrex
IndexOnlyScanRegexp(table[ POSIX Regexp...]) Truy xuất chỉ mục dựa theo các mẫu Regrex mà không truy cập bảng
BitmapScanRegexp(table[ POSIX Regexp...]) Truy xuất Bitmap dựa theo các mẫu Regrex chỉ định
NoSeqScan(table) Truy xuất không theo thứ tự
NoTidScan(table) Truy xuất không theo TID
NoIndexScan(table) Truy xuất không theo chỉ mục
NoIndexOnlyScan(table) Truy xuất không theo chỉ mục mà không cần truy cập
NoBitmapScan(table) Truy xuất không theo Bitmap


Phương pháp join Giải thích
NestLoop(table table[ table...]) Vòng lặp lồng nhau bắt buộc cho các liên kết bao gồm các bảng được chỉ định.
HashJoin(table table[ table...]) Tạo kết nối dựa theo bảng băm của các bảng được chỉ định.
MergeJoin(table table[ table...]) Hợp nhất các liên kết của các bảng chỉ định
NoNestLoop(table table[ table...]) Ngược lại với Nestloop
NoHashJoin(table table[ table...]) Ngược lại với Hashjoin
NoMergeJoin(table table[ table...]) Ngược lại với MergeJoin


Phương pháp khác Giải thích
Leading(table table[ table...]) Tạo liên kết theo tự các bảng chỉ định
Leading() Tạo liên kết theo thứ tự và hướng mặc định
Rows(table table[ table...] correction) Sửa số hàng của liên kết bao gồm các bảng đã xác định
Parallel(table [soft|hard]) Sử dụng hay ngăn chặn việc xử lý nhiều luồng song song
Set(GUC-param value) Thiết lập các giá trị GUC trong lúc thực hiện kế hoạch (planner)


Cảm ơn bạn đã đọc tôi!!!

Cấu hình PostgreSQL cluster với pacemaker và DRBD

HA (high availability) là một cấu trúc hệ thống không thể thiếu trong vận hành một database system. Bài viết này sẽ giới thiệu cách cấu hình một PostgreSQL cluster sử dụng pacemaker và DRDB.

Pacemaker

Pacemaker là một phần mềm mã nguồn mở dùng để quản lý HA cluster được sử dụng rất phổ biến trong các hệ thống hạ tầng IT.

Đặc điểm của pacemaker

Pacemaker được cấu thành từ 2 bộ phận chính corosync và pacemaker. Corosync thực hiện giám sát, giao tiếp giữa các node trong cluster, trong khi pacemaker quản lý điều khiển các hoạt động của resource agents trong cluster. Resource agents là những agent được viết dưới dạng script (bash, perl, ..) xử lý giám sát các resource (như volume, VIP, filesystem,..) và được điều khiển bởi pacemaker.

Về tổng quan, pacemaker nổi bật với những tính năng bên dưới.

  • Giám sát hệ thống và tự động phục hồi service khi có lỗi
  • Hỗ trợ nhiều servers trong cùng một cluster
  • Tính sử dụng cao (nhờ có thể chỉnh sửa resource agent)

DRBD (Distributed Replicated Block Device)

DRBD là một phần mềm phát triển bởi linbit dùng để đồng bộ dữ liệu giữa 2 node ở mức độ block dữ liệu. drbd được sử dụng phổ biến trong những hệ thống đơn giản và dữ liệu đồng bộ không lớn lắm. Một số đặc điểm về drbd.

  • Thiết lập ban đầu đơn giản
  • Dễ dàng kết hợp với cluster như pacemaker
  • Không cần hiệu chỉnh nhiều trong lúc vận hành

Ngoài những ưu điểm trên, DRBD khó vận hành khi replicate nhiều nodes (ở phiên bản trước 9.0, DRBD chỉ cho phép replicate giữa 2 nodes)

  • drbd chỉ cho phép đồng bộ dữ liệu giữa 2 node.
  • đồng bộ toàn bộ (drbd volume) dữ liệu khi split brain xảy ra.

Ở một số phương pháp đồng bộ khác như rsync, chỉ cần đồng bộ những files có thay đổi. Như vậy sẽ giảm thiểu nhiều thời gian đồng bộ dữ liệu từ primary node. Thời gian phục hồi secondary node ảnh hưởng tới tính HA của hệ thống.

Cấu hình

Bên dưới mình trình bày một hướng dẫn cụ thể cấu hình một PostgreSQL cluster sử dụng pacemaker và DRBD.

Môi trường thực thi

# Resources phiên bản Ghi Chú
1 OS CentOS 8 Bao gồm 2 nodes, node1: 172.17.28.69 và node2: 172.17.28.71
2 PostgreSQL 13 beta 2 sử dụng bản build từ source
3 Pacemaker Sử dụng package từ CentOS yum repo Sử dụng rerource agents: drbd, Filesystem, pgsql, IP
4 DRBD 9.0 sử dụng giao thức (mức độ đồng bộ) B (đồng bộ trên memory hay tiền đồng bộ). Bài viết này mình cấu hình DRBD trên LVM (phần mềm quản lý volume logic được sử dụng rất phổ biến.

Các bước thực hiện

Cài đặt PostgreSQL 13 beta2 Thực hiện trên: 2 nodes

Đã có nhiều bài viết liên quan tới cài đặt nên ở đây mình sẽ giảm thiểu giải thích các bước cài đặt PostgreSQL

# cd /usr/local/src
# wget https://ftp.postgresql.org/pub/source/v13beta2/postgresql-13beta2.tar.gz > /dev/null
# tar xfz postgresql-13beta2.tar.gz
# cd postgresql-13beta2
# ./configure --prefix=/usr/local/pgsql/pg13 > /dev/null
# make -j16 install > /dev/null

Cấu hình LVM và DRBD

  1. Thực hiện trên: 2 nodes Download drbd packages
    Download DRBD packages từ đây
+ drbd90-utils-9.13.1-1.el8.elrepo.x86_64.rpm
+ drbd90-utils-sysvinit-9.13.1-1.el8.elrepo.x86_64.rpm
+ kmod-drbd90-9.0.23-1.el8_2.elrepo.x86_64.rpm
  1. Thực hiện trên: 2 nodes Cài đặt drbd packages
sudo yum localinstall *rpm
  1. Thực hiện trên: 2 nodes Kiểm tra xem firewalld đã tắt chưa
● firewalld.service - firewalld - dynamic firewall daemon
   Loaded: loaded (/usr/lib/systemd/system/firewalld.service; disabled; vendor preset: enabled)
   Active: inactive (dead)
     Docs: man:firewalld(1)

Tắt Firewalld ở đây để thuận lợi khi giao tiếp giữa các nodes. Nếu firewalld chưa tắt, bạn có thể tắt và vô hiệu hóa bằng lệnh systemctl stop firewalld; systemctl disable firewalld.

  1. Thực hiện trên: 2 nodes Tạo ổ đĩa logic LVM

Thông tin thiết lập LVM

# Resources phiên bản
1 Tên ổ đĩa /dev/sdb
2 Tên physical volume /dev/sdb1
3 Tên volume group vg
4 Tên logical volume lv

Ở đây mình chuẩn bị một đĩa cứng với dung lượng 1GB (sdb) và chỉ sử dụng 512MB cho DRBD volume.

# fdisk /dev/sdb 
...snip...
Command (m for help): n
Partition type
   p   primary (0 primary, 0 extended, 4 free)
   e   extended (container for logical partitions)
Select (default p): 

Using default response p.
Partition number (1-4, default 1): 
First sector (2048-2097151, default 2048): 
Last sector, +sectors or +size{K,M,G,T,P} (2048-2097151, default 2097151): 

Created a new partition 1 of type 'Linux' and of size 1023 MiB.

Command (m for help): w
The partition table has been altered.
Calling ioctl() to re-read partition table.
Syncing disks.

# lsblk 
NAME        MAJ:MIN RM  SIZE RO TYPE MOUNTPOINT
sda           8:0    0   15G  0 disk 
├─sda1        8:1    0    1G  0 part /boot
└─sda2        8:2    0   14G  0 part 
  ├─cl-root 253:0    0 12.5G  0 lvm  /
  └─cl-swap 253:1    0  1.5G  0 lvm  [SWAP]
sdb           8:16   0    1G  0 disk 
└─sdb1        8:17   0 1023M  0 part 
sr0          11:0    1  7.7G  0 rom  
# pvcreate /dev/sdb1
  Physical volume "/dev/sdb1" successfully created.
# vgcreate vg /dev/sdb1
  Volume group "vg" successfully created
# lvcreate --size 512MB --name lv vg
  Logical volume "lv" created.
#
# lsblk 
NAME        MAJ:MIN RM  SIZE RO TYPE MOUNTPOINT
sda           8:0    0   15G  0 disk 
├─sda1        8:1    0    1G  0 part /boot
└─sda2        8:2    0   14G  0 part 
  ├─cl-root 253:0    0 12.5G  0 lvm  /
  └─cl-swap 253:1    0  1.5G  0 lvm  [SWAP]
sdb           8:16   0    1G  0 disk 
└─sdb1        8:17   0 1023M  0 part 
  └─vg-lv   253:2    0  512M  0 lvm  
sr0          11:0    1  7.7G  0 rom  
[root@node1 src]# 
  1. Tạo ổ đĩa DRBD trên LVM đã tạo

Thông tin thiết lập ổ DRBD

# Nội dung giải thích
1 Tên LVM sử dụng cho DRBD /dev/vg/lv
2 Node1 IP 172.17.28.69
3 Node2 IP 172.17.28.71
4 Port sử dụng cho replicate dữ liệu 7001
5 Protocol B (đồng bộ mức độ bộ nhớ)
  • Thực hiện trên: 2 nodes Tạo file drbd resource
# vi /etc/drbd.d/pgres.res
resource pgres {
    protocol B;
    device minor 1;
    meta-disk internal;
    disk /dev/mapper/vg-lv;
    on node1 {
        address 172.17.28.69:7001;
    }
    on node2 {
        address 172.17.28.71:7001;
    }
}

Bạn có thể thao khảo thêm ở manual của DRBD để có thêm nhiều tinh chỉnh.

  • Thực hiện trên: 2 nodes Tạo meta data cho ổ DRBD
# drbdadm create-md pgres
initializing activity log
initializing bitmap (16 KB) to all zero
Writing meta data...
New drbd meta data block successfully created.
# 
  • Thực hiện trên: 2 nodes Khởi động DRBD
# systemctl start drbd
# systemctl enable drbd
Synchronizing state of drbd.service with SysV service script with /usr/lib/systemd/systemd-sysv-install.
Executing: /usr/lib/systemd/systemd-sysv-install enable drbd
Created symlink /etc/systemd/system/multi-user.target.wants/drbd.service → /usr/lib/systemd/system/drbd.service.
# drbdadm status pgres
pgres role:Secondary
  disk:Inconsistent
  node2 role:Secondary
    peer-disk:Inconsistent
  • Thực hiện trên: Node1 Thiết lập node 1 là primary
[root@node1 ~]# drbdadm --force primary pgres
[root@node1 ~]# drbdadm status pgres
pgres role:Primary
  disk:UpToDate
  node2 role:Secondary
    peer-disk:UpToDate

[root@node1 ~]##
  • Thực hiện trên: Node1 Định dạng xfs cho ổ DRBD
[root@node1 src]# mkfs.xfs /dev/drbd1 -L PGDATA -f
meta-data=/dev/drbd1             isize=512    agcount=4, agsize=32765 blks
         =                       sectsz=512   attr=2, projid32bit=1
         =                       crc=1        finobt=1, sparse=1, rmapbt=0
         =                       reflink=1
data     =                       bsize=4096   blocks=131059, imaxpct=25
         =                       sunit=0      swidth=0 blks
naming   =version 2              bsize=4096   ascii-ci=0, ftype=1
log      =internal log           bsize=4096   blocks=1368, version=2
         =                       sectsz=512   sunit=0 blks, lazy-count=1
realtime =none                   extsz=4096   blocks=0, rtextents=0
[root@node1 src]#

Tới đây mình có thể sử dụng ổ drbd, dữ liệu sẽ được đồng bộ từ node primary sang secondary. Bạn có thể chuyển chuyển vai trò các nodes lẫn nhau nhờ lệnh drbd secondary pgres để chuyển vai trò ổ drbd sang secondary (passive) drbd primary pgres để chuyển vai trò thành primary (active)

Cài đặt Pacemaker

Phần này mình sẽ hướng dẫn cài đặt pacemaker với cấu trúc như bên dưới.

+                       [ VIP: 172.17.28.111 ] (resources: drbd, Filesystem, pgsql, Ip)
+                                  |
++----------------------+          |          +----------------------+
+| [  Cluster Node1  ]  |          |          | [  Cluster Node2  ]  |
+|   IP: 172.17.28.69   +----------+----------+   172.17.28.71       |
+|                      |                     |                      |
++----------------------+                     +----------------------+

Các giá trị thiết lập cho pacemaker resources.

# Resource giá trị Chú thích
1 ocf:linbit:drbd drbd_resource=pgres Sử dụng pgres resource vừa tạo
2 ocf:heartbeat:Filesystem device="/dev/drbd1" directory=/pgdata fstype=xfs Mount ổ DRBD vào thư mục dữ liệu
3 ocf:heartbeat:pgsql

pgctl=/usr/local/pgsql/pg13/bin/pg_ctl

psql=/usr/local/pgsql/pg13/bin/psql 

pgdata=/pgdata/pg13data pgport=5432

PostgreSQL resource. Thực hiện các thao tác khởi động, monitoring, ... PostgreSQL.
4 ocf:heartbeat:IPaddr2 ip=172.17.28.111 VIP resource. Thực hiện các thao tác khởi động mornitoring, ... IP ảo cho cluster.

Các bước thực hiện với pacemaker

  • Thực hiện trên: 2 Nodes thực hiện enable HighAvailability yum repo (mặc định repo này không được enable trên CentOS 8), và cài đặt pacemaker packages.
# dnf config-manager --set-enabled HighAvailability
# yum install -y pacemaker pcs fence-agents-all psmisc > /dev/null
  • Thực hiện trên: 2 Nodes Thiết lập mật khẩu cho hacluster OS user (user này được tạo ra khi cài đặt pacemaker packages).
# echo "firstclt" | sudo passwd hacluster --stdin
Changing password for user hacluster.
passwd: all authentication tokens updated successfully.
  • Thực hiện trên: 2 Nodes Khởi động pcsd deamon (để có thể thực hiện các câu lệnh pcs).
# sudo systemctl start pcsd.service
# systemctl enable pcsd.service
Created symlink /etc/systemd/system/multi-user.target.wants/pcsd.service → /usr/lib/systemd/system/pcsd.service.
  • Thực hiện trên: 2 Nodes Thực hiện chứng thực giữa các nodes cho cluster
# sudo pcs host auth node1 node2 -u hacluster -p firstclt
node2: Authorized
node1: Authorized
  • Thực hiện trên: Node1 Khởi tạo cluster và khởi động
[root@node1 ~]# sudo pcs cluster setup firstcluster node1 node2 --force --start
...snip...
Sending 'corosync authkey', 'pacemaker authkey' to 'node1', 'node2'
node2: successful distribution of the file 'corosync authkey'
node2: successful distribution of the file 'pacemaker authkey'
node1: successful distribution of the file 'corosync authkey'
node1: successful distribution of the file 'pacemaker authkey'
Sending 'corosync.conf' to 'node1', 'node2'
node2: successful distribution of the file 'corosync.conf'
node1: successful distribution of the file 'corosync.conf'
Cluster has been successfully set up.
Starting cluster on hosts: 'node1', 'node2'...
[root@node1 ~]#
  • Xác nhận trạng thái cluster
# crm_mon -Arf1
Cluster Summary:
  * Stack: corosync
  * Current DC: node1 (version 2.0.3-5.el8_2.1-4b1f869f0f) - partition with quorum
  * Last updated: Wed Jul 15 03:29:57 2020
  * Last change:  Wed Jul 15 03:29:48 2020 by hacluster via crmd on node1
  * 2 nodes configured
  * 0 resource instances configured

Node List:
  * Online: [ node1 node2 ]

Full List of Resources:
  * No resources

Migration Summary:
  • Thực hiện trên: Node1 Thiết lập một số thông số mặc định
[root@node1 ~]# pcs cluster enable --all # thiết lập khởi động cluster cùng với OS
[root@node1 ~]# pcs property set stonith-enabled=false  # không thiết lập snonith vì không có device liên quan
[root@node1 ~]# pcs property set cluster-recheck-interval=10m # kiểm tra trạng thái mỗi 10 phút
[root@node1 ~]# pcs property set no-quorum-policy=ignore # thiết lập thao tác khi mất quorum 
  • Thực hiện trên: Node1 Tạo DRBD resource trên cluster
# pcs resource create drbd-fisrtcluster ocf:linbit:drbd drbd_resource=pgres op monitor \
interval=15s op start timeout=60 op stop timeout=60 op promote timeout=90
# pcs resource promotable drbd-fisrtcluster master-max=1 master-node-max=1 clone-max=2 clone-node-max=1 notify=true
# pcs resource cleanup

Kiểm tra trạng thái cluster

# crm_mon -Arf1
...snip...
Full List of Resources:
  * Clone Set: drbd-fisrtcluster-clone [drbd-fisrtcluster] (promotable):
    * Masters: [ node1 ]
    * Slaves: [ node2 ]
...snip...
  • Thực hiện trên: Node1 Tạo Filesystem resource trên cluster
# sudo mkdir /pgdata # tạo data directory để mount filesystem
# sudo pcs resource create pgFS-firstcluster ocf:heartbeat:Filesystem device="/dev/drbd1" \
 directory=/pgdata fstype=xfs options=defaults,noatime,nodiratime,attr2 op start timeout=60 \
op stop timeout=60 --group masterg-firstcluster
  • Kiểm tra trạng thái cluster
# crm_mon -Arf1
...snip...
Full List of Resources:
  * Clone Set: drbd-fisrtcluster-clone [drbd-fisrtcluster] (promotable):
    * Masters: [ node1 ]
    * Slaves: [ node2 ]
  * Resource Group: masterg-firstcluster:
    * pgFS-firstcluster (ocf::heartbeat:Filesystem):    Started node1
...snip...
  • Thực hiện trên: Node1 Khởi tạo postgres DB cluster trên filesystem vừa tạo
[root@node1 ~]# chown postgres /pgdata/ -R
[root@node1 ~]# df -h /pgdata
Filesystem      Size  Used Avail Use% Mounted on
/dev/drbd1      507M   30M  478M   6% /pgdata
[root@node1 ~]# su - postgres
$ /usr/local/pgsql/pg13/bin/initdb -E utf8 --no-locale -D /pgdata/pg13data
  • Thực hiện trên: Node1 Tạo pgsql resource cho postgres
# sudo pcs resource create pgsql-firstcluster ocf:heartbeat:pgsql \
pgctl=/usr/local/pgsql/pg13/bin/pg_ctl psql=/usr/local/pgsql/pg13/bin/psql \
pgdata=/pgdata/pg13data pgport=5432 stop_escalate=1 op start timeout=60s \
interval=0s on-fail=restart op monitor timeout=60s interval=7s on-fail=restart \
op monitor timeout=60s interval=2s on-fail=restart role=Master op promote \
timeout=60s interval=0s on-fail=restart op demote timeout=60s interval=0s \
on-fail=stop op stop timeout=60s interval=0s on-fail=block op notify timeout=60s \
interval=0s --group masterg-firstcluster
  • Thiết lập failover postgres resource nếu số lượng lỗi (không thể kết nối) là một lần.
# pcs resource meta pgsql-firstcluster migration-threshold=1
  • Kiểm tra trạng thái cluster
# crm_mon -Arf1
...snip...
Full List of Resources:
  * Clone Set: drbd-fisrtcluster-clone [drbd-fisrtcluster] (promotable):
    * Masters: [ node1 ]
    * Slaves: [ node2 ]
  * Resource Group: masterg-firstcluster:
    * pgFS-firstcluster (ocf::heartbeat:Filesystem):    Started node1
    * pgsql-firstcluster        (ocf::heartbeat:pgsql): Started node1
...snip...
# ps -ef | grep postgres: | grep -v grep
postgres   11226   11217  0 03:47 ?        00:00:00 postgres: checkpointer
postgres   11227   11217  0 03:47 ?        00:00:00 postgres: background writer
postgres   11228   11217  0 03:47 ?        00:00:00 postgres: walwriter
postgres   11229   11217  0 03:47 ?        00:00:00 postgres: autovacuum launcher
postgres   11230   11217  0 03:47 ?        00:00:00 postgres: stats collector
postgres   11231   11217  0 03:47 ?        00:00:00 postgres: logical replication launcher
#
  • Thực hiện trên: Node1 Tạo VIP cho cluster
# sudo pcs resource create vip-firstcluster ocf:heartbeat:IPaddr2 ip=172.17.28.111 \
nic=ens33 cidr_netmask=28 op start timeout=60s interval=0s on-fail=restart \
op monitor timeout=120s interval=20s on-fail=restart op stop timeout=60s \
interval=0s on-fail=block --group masterg-firstcluster
  • Kiểm tra trạng thái cluster
# crm_mon -Arf1
...snip...
Full List of Resources:
  * Clone Set: drbd-fisrtcluster-clone [drbd-fisrtcluster] (promotable):
    * Masters: [ node1 ]
    * Slaves: [ node2 ]
  * Resource Group: masterg-firstcluster:
    * pgFS-firstcluster (ocf::heartbeat:Filesystem):    Started node1
    * pgsql-firstcluster        (ocf::heartbeat:pgsql): Started node1
    * vip-firstcluster  (ocf::heartbeat:IPaddr2):       Started node1
...snip...
# ip a | grep -w inet
    inet 127.0.0.1/8 scope host lo
    inet 172.17.28.69/28 brd 172.17.28.79 scope global noprefixroute ens33
    inet 172.17.28.111/28 scope global ens33
    inet 192.168.91.131/24 brd 192.168.91.255 scope global dynamic noprefixroute ens37
#
  • Thực hiện trên: Node1 Tạo constraint cho cluster
  • Khởi động group master với DRBD trên cùng một Node
# sudo pcs constraint colocation add started masterg-firstcluster with Master \
drbd-fisrtcluster-clone INFINITY 
  • Khởi động theo thứ tự DRBD xong rồi master group
# sudo pcs constraint order promote drbd-fisrtcluster-clone then start \
masterg-firstcluster symmetrical=false score=INFINITY 
  • Thực hiện trên: Node1 Test failover cluster
    • Kiểm tra trạng thái cluster
# crm_mon -Arf1
...snip...
Full List of Resources:
  * Clone Set: drbd-fisrtcluster-clone [drbd-fisrtcluster] (promotable):
    * Masters: [ node1 ]
    * Slaves: [ node2 ]
  * Resource Group: masterg-firstcluster:
    * pgFS-firstcluster (ocf::heartbeat:Filesystem):    Started node1
    * pgsql-firstcluster        (ocf::heartbeat:pgsql): Started node1
    * vip-firstcluster  (ocf::heartbeat:IPaddr2):       Started node1
...snip...
  • Failover master resource sang node2
# pcs resource move masterg-firstcluster
Warning: Creating location constraint 'cli-ban-masterg-firstcluster-on-node1' with a score of -INFINITY for resource masterg-firstcluster on node1.
        This will prevent masterg-firstcluster from running on node1 until the constraint is removed
        This will be the case even if node1 is the last node in the cluster
  • Kiểm tra trạng thái cluster
# crm_mon -Arf1
...snip...
Full List of Resources:
  * Clone Set: drbd-fisrtcluster-clone [drbd-fisrtcluster] (promotable):
    * Masters: [ node2 ]
    * Slaves: [ node1 ]
  * Resource Group: masterg-firstcluster:
    * pgFS-firstcluster (ocf::heartbeat:Filesystem):    Started node2
    * pgsql-firstcluster        (ocf::heartbeat:pgsql): Started node2
    * vip-firstcluster  (ocf::heartbeat:IPaddr2):       Started node2
...snip...
  • Xóa constraint tạo ra bởi lệnh move resource
# pcs resource clear masterg-firstcluster
Removing constraint: cli-ban-masterg-firstcluster-on-node1

Đến đây bạn đã có một PostgreSQL cluster tự động failover giữa các nodes nếu gặp lỗi.

Lời kết

Bao gồm pacemaker có rất nhiều cấu trúc cluster có thể áp dụng cho hệ thống của bạn. Bạn nên tham khảo vào mục đích sử dụng, yêu cầu từ hệ thống và business để lựa chọn cấu hình phù hợp với hệ thống của mình.

Cấu hình master slave cho postgresql 12

Hướng dẫn cấu hình master-slave cho postgresql version 12

Ví dụ chúng ta có 2 server cần cấu hình mô hình master-slave:
Master node: 10.133.36.95
Slave node: 10.133.36.96

Trước tiên bạn cần cài đặt postgresql 12 cho 2 servers như các hướng dẫn ở phần trước:
Hướng dẫn cài đặt postgres 12 từ Source Code (27/03/2020)
Hướng dẫn cấu hình postgresql service trong systemd(28/03/2020)

Bây giờ chúng ta tiến hành cấu hình mô hình master-slave:

Thực hiện cấu hình cho master node

step 01: Tạo thư mục archive wal

$ sudo mkdir -p /usr/local/pgsql/archive/
$ sudo chmod 700 /usr/local/pgsql/archive/
$ sudo chown -R postgres:postgres /usr/local/pgsql/archive/

step 02: Thực hiện cấu hình trên postgresql.conf

$ cd /usr/local/pgsql/data
$ vim postgresql.conf
 

listen_addresses = '10.133.36.95'
wal_level = hot_standby
synchronous_commit = on
archive_mode = on
archive_command = 'cp %p /usr/local/pgsql/archive/%f'
max_wal_senders = 2
wal_keep_segments = 10
synchronous_standby_names = 'slave_db'

step 03: Tạo new user với quyền replication

sudo -u postgres psql
postgres=# createuser --replication -P replica
Enter password for new role:
Enter it again:

step 04: Thực hiện cấu hình trên pg_hba.conf

$ cd /usr/local/pgsql/data/
$ vim pg_hba.conf

# Localhost
host replication replica 127.0.0.1/32 md5

# Master
host replication replica 10.133.36.95/32 md5

# Slave
host replication replica 10.133.36.96/32 md5

step 05: Khởi động lại postgresql database

$ sudo systemctl restart postgresql


Thực hiện cấu hình cho slave node

step 01: Dừng chạy postgresql

$ sudo systemctl stop postgresql

step 02: Xóa tất cả file trong thư mục data

rm -rf /usr/local/pgsql/data/*

step 03: Copy tất cả file từ thư mục data của master node sang slave node

$ pg_basebackup -h 10.133.36.95 -U replica -p 5432 -D /usr/local/pgsql/data -Fp -Xs -P -R

step 04: Tạo file standby.signal

(Chú ý: đây là điểm khác biệt của version 12 so với các version trước)
touch /usr/local/pgsql/data/standby.signal

step 05: Thực hiện khai báo cấu hình vào file config postgres

$ cd /usr/local/pgsql/data
$ vim postgresql.conf
listen_addresses = '10.133.36.96'
hot_standby = on
$ vim postgresql.auto.conf
primary_conninfo = 'user=replica password=root host=10.133.36.95 port=5432 sslmode=prefer sslcompression=0 gssencmode=disable target_session_attrs=any application_name=slave_db'

step 06: khởi động postgresql service

sudo systemctl start postgresql
 

Kiểm tra lại kết quả

$ psql -x -c "select * from pg_stat_replication"

Như vậy bạn đã cấu hình xong mô hình master-slave cho postgresql version 12. Và bạn thấy điểm khác biệt là vesion 12 sẽ không còn file recovery.conf như các version trước nữa.Hãy khám phá thêm những điểm khác biệt của version 12 ở các bài viết tiếp nhé

PostgreSQL 10~ Declarative Partitioning

Lời mở đầu

Partitioning bảng dữ liệu, là chức năng tách dữ liệu vật lý của một bảng dữ liệu lớn sang các bảng nhỏ hơn.
Nhờ phân chia dữ liệu được qua các bảng con nhỏ hơn chức năng được biết đến với những lợi ích như bên dưới.

  • Tăng performance của hệ thống.
    Thay vì truy cập dữ toàn bộ dữ liệu (hay thực hiện scan toàn index), chức năng này chỉ truy cập dữ liệu ở bảng (index) con cần thiết, ngoài ra có thể thực hiện truy vấn song song trên các bảng con nên performance tăng đáng kể nếu có thiết kế thích hợp.
  • Quản lý dễ dàng.
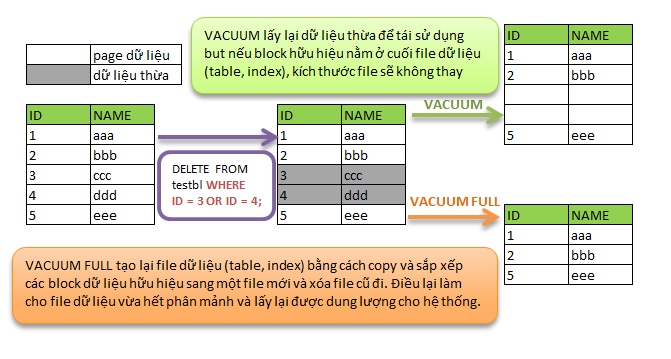
    Đối với dữ liệu thiết kế kiểu INSERT/DELETE diễn ra định kỳ. Bạn có thể xoá dữ liệu bằng DROP bảng con không cần thiết, thay vì thực hiện DELETE và VACUUM.
    Ngoài ra việc migration dữ liệu, backup/restore, hay các thao tác maintenance dữ liệu như VACUUM/REINDEX cũng diễn ra dễ dàng hơn.

PostgreSQL hỗ trợ chức năng Partitioning bảng dữ liệu.
Trước phiên bản 10, PostgreSQL cung cấp chức năng kế thừa (INHERITS) để thực hiện partitioning bảng dữ liệu. Nhưng việc điều hướng dữ liệu đến các bảng con khi INSERT hay UPDATE không diễn ra tự động mà phải sử dụng TRIGGER để thực hiện.

Bài viết này giới thiệu về chức năng partitioning bảng dữ liệu theo kiến trúc mới, chức năng Declarative Partitioning được đưa vào từ phiên bản PostgreSQL 10.

Scale out cho hệ thống PostgreSQL

Trước khi đi vào giới thiệu cụ thể, xin được tóm tắt các kỹ thuật scale out hệ thống của PostgreSQL hiện tại.
Đối với các hệ thống lớn hay các hệ thống dữ liệu có độ lớn tăng dần theo thời gian, việc thiết kế scale out (chia nhỏ dữ liệu thành nhiều phần để dễ quản lý) là một việc quan trọng nếu không muốn xử lý các vấn đề về dung lượng sau vận hành. PostgeSQL cung cấp các chức năng như bên dưới để hỗ trợ scale out hệ thống.
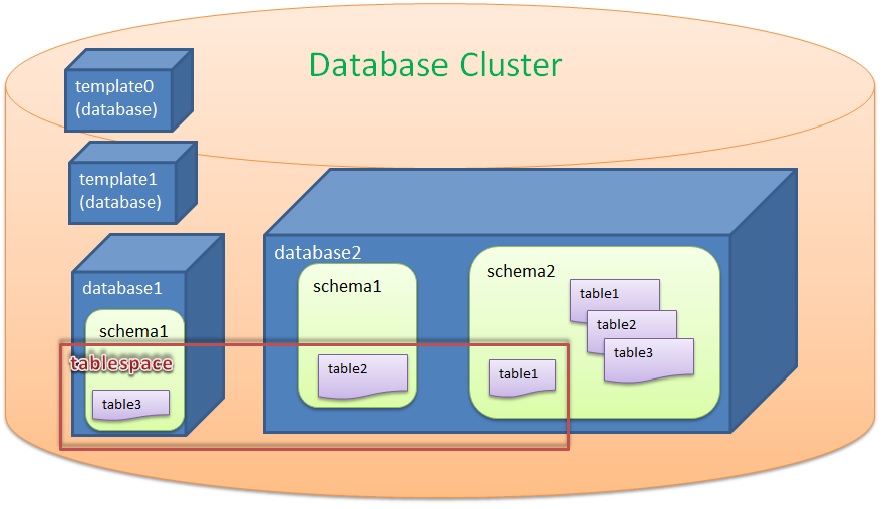
  • Sử dụng TABLESPACE
    Từ các phiên bản cũ TABLESPACE đã được sử dụng như công cụ để phân tán dữ liệu qua nhiều đĩa cứng giảm disk I/O. Nhưng gần đây gần đây nhiều hệ thống chuyển qua sử dụng RAID, nên chức năng này cũng không được sử dụng nhiều
  • Sử dụng các software liên quan
    Sử dụng một số cluster software như PostgreSQL-XL, pacemaker, pgpool-II sử dụng slave node để tham chiếu giảm tải cho master. Hay dùng chức năng load balancer (của pgpool-II),... cũng có thể được coi là một trong các giải pháp scale out. Giải pháp này hơi khó khăn về mặt bảo trì về cấu trúc hệ thống.
  • Cascade Replication
    Là chức năng đưa vào từ phiên bản 9.2 của PostgreSQL, slave node có thể chuyển tiếp đồng bộ sang các node slave mới.Ta có thể sử dụng chức năng này để scale out cho hệ thống. Hạn chế của cấu trúc này là cascade replication chỉ support phi đồng bộ, thời gian phản ánh WAL (transaction log) lên các slave node có thể trễ, nên dữ liệu trên slave không phải lúc nào cũng là mới nhất.
  • Sử dụng postgres_fwd
    Contrib postgres_fwd cho phép PostgreSQL kết nối tới server bên ngoài. PostgreSQL 9.6 hỗ trợ push down, kết quả được sử lý (sort, join, ...) ở remote server trước khi gửi về local. Việc này làm giảm tải rất nhiều cho local server trong các hệ thống lớn.
    Chức năng này trong tương lai được kỳ vọng là tạo thành nền tảng cho chức năng Sharding giống như các RDBMS như mongodb.
  • Partitioning Table
    Chức năng phân tán dữ liệu từ một bảng sang nhiều bảng con để tăng khả năng scale out cho hệ thống. Từ Application chỉ cần chú ý tới bảng dữ liệu cha. Dữ liệu khi INSERT/UPDATE vào bảng cha sẽ được phân tán tới các bảng con. Khi SELECT dữ liệu bảng cha, nhờ chức năng Partitioning dữ liệu các bảng con được tập hợp lại và gửi lại cho bảng cha. Các hệ thống cũ thường sử dụng chức năng này kết hợp với TABLESPACE để scale out hệ thống.

Chức năng Partitioning của PostgreSQL

Chức năng này cũng là một chức năng được được PostgreSQL đưa vào sớm từ phiên bản 8.1. Mặc dù có một số hạn chế overhead do phải thiết dựa trên trigger, nhưng chức năng này cũng được sử dụng rộng dãi cho tới nay. Từ phiên bản 10 PostgreSQL hỗ trợ phương thức partitioning mới, không dựa vào trigger nên có performance tốt và cách sử dụng đơn giản.

Chức năng Partitioning sử dụng kế thừa

Ở các phiên bản trước của PostgreSQL 10, để sử dụng chức năng partitioning. Ta cần các bước tổng quan như sau.

  1. Tạo bảng master
  2. Tạo các bảng con
  3. Tạo TRIGGER cho bảng master

Tạo bảng master

Ta tạo bảng master với các trường cần thiết.
Ở đây ta sử dụng cột range cho chức năng partitioning.

10000 postgres@postgres=# CREATE TABLE parent(id integer, childname text, range bigint);
CREATE TABLE

Tạo các bảng con

Bạn có thể định nghĩa số lượng bảng con tuỳ ý theo thiết kế hệ thống của bạn. Nhưng community khuyến cáo không nên sử dụng quá 100 bảng con.
Ví dụ bên dưới mình tạo 3 bảng con kế thừa bảng master.
Ở đây mình sử dụng ràng buộc CHECK dữ liệu, để bảng con tương ứng chỉ chứa những giá trị cho phép.
Khi tham chiếu dữ liệu bảng cha, PostgreSQL có thể dựa vào ràng buộc CHECK của bảng con để bỏ qua tham chiếu tới các bảng con không cần thiết.

10000 postgres@postgres=# CREATE TABLE child1(check(range <= 99999)) inherits(parent);
CREATE TABLE
10000 postgres@postgres=# CREATE TABLE child2(check(range > 99999 and range <= 199999)) inherits(parent);
CREATE TABLE
10000 postgres@postgres=# CREATE TABLE child3(check(range > 199999)) inherits(parent);
CREATE TABLE
10000 postgres@postgres=#

Tạo TRIGGER cho bảng master

Mặc định khi tạo table con ta đã có thể sử dụng chức năng partitioning để truy suất dữ liệu các bảng con thông qua bảng master. Nhưng để insert dữ liệu tới các bảng con thông qua bảng master ta phải sử dụng chức năng TRIGGER của PostgreSQL.
Ví dụ bên dưới thực hiện:

  • Tạo hàm TRIGGER insert_to_child cho phép kiểm tra dữ liệu INSERT và, thực hiện INSERT vào các bảng con tương ứng mà không thực hiện INSERT trên bảng master (return NULL;).
  • Sử dụng hàm insert_to_child đã định nghĩa để tạo TRIGGER cho bảng master trước khi INSERT dữ liệu.

Ta có thể sử dụng chức năng RULE của PostgreSQL thay vì tạo TRIGGER. RULE có overhead nhiều hơn TRIGGER khi INSERT 1 hàng, nhưng ngược lại khi INSERT một khối lượng lớn dữ liệu (ví dụ như COPY) thì overhead nhỏ hơn TRIGGER.

10000 postgres@postgres=# CREATE OR REPLACE FUNCTION insert_to_child () RETURNS TRIGGER
AS 
$$ 
BEGIN
    IF (NEW.range <= 99999) THEN
        INSERT INTO child1 VALUES (NEW.*);
    ELSIF (NEW.range > 99999 AND NEW.range <= 199999) THEN
        INSERT INTO child2 VALUES (NEW.*);
    ELSIF (NEW.range > 199999) THEN
        INSERT INTO child3 VALUES (NEW.*);
    ELSE
        RAISE EXCEPTION 'out of range';
    END IF;
    RETURN NULL;
END;
$$
LANGUAGE PLPGSQL;
CREATE FUNCTION
10000 postgres@postgres=# CREATE TRIGGER insert_to_child_tg BEFORE INSERT ON parent FOR EACH ROW EXECUTE PROCEDURE insert_to_child();
CREATE TRIGGER

Sau khi tạo được bảng con và TRIGGER cho bảng master. Bảng master sẽ có cấu trúc như bên dưới.

10000 postgres@postgres=# \d+ parent
                                    Table "public.parent"
  Column   |  Type   | Collation | Nullable | Default | Storage  | Stats target | Description 
-----------+---------+-----------+----------+---------+----------+--------------+-------------
 id        | integer |           |          |         | plain    |              | 
 childname | text    |           |          |         | extended |              | 
 range     | bigint  |           |          |         | plain    |              | 
Triggers:
    insert_to_child_tg BEFORE INSERT ON parent FOR EACH ROW EXECUTE PROCEDURE insert_to_child()
Child tables: child1,
              child2,
              child3

Thực hiện truy vấn

INSERT & SELECT dữ liệu

Ví dụ bên dưới INSERT 3 dòng dữ liệu thông qua bảng master và xác nhận dữ liệu đã được ghi vào các bảng con nhờ TRIGGER đã định nghĩa.

10000 postgres@postgres=# INSERT INTO parent VALUES (1,'a',1), (2,'b',199999), (3,'c',200000);
INSERT 0 0
10000 postgres@postgres=# SELECT * FROM parent ;
 id | childname | range  
----+-----------+--------
  1 | a         |      1
  2 | b         | 199999
  3 | c         | 200000
(3 rows)
10000 postgres@postgres=# SELECT * FROM parent ;
 id | childname | range  
----+-----------+--------
  1 | a         |      1
  2 | b         | 199999
  3 | c         | 200000
(3 rows)

10000 postgres@postgres=# SELECT * FROM child1;
 id | childname | range 
----+-----------+-------
  1 | a         |     1
(1 row)

10000 postgres@postgres=# SELECT * FROM child2;
 id | childname | range  
----+-----------+--------
  2 | b         | 199999
(1 row)

10000 postgres@postgres=# SELECT * FROM child3;
 id | childname | range  
----+-----------+--------
  3 | c         | 200000
(1 row)

Như kết quả EXPLAIN của câu lệnh SELECT bảng master bên dưới. Dữ liệu được tìm kiếm ở các bảng con chứa dữ liệu tương ứng và bảng master.

10000 postgres@postgres=# EXPLAIN (ANALYZE,VERBOSE) SELECT * FROM parent WHERE range IN (1,199999);
                                                   QUERY PLAN                                                   
----------------------------------------------------------------------------------------------------------------
 Append  (cost=0.00..48.37 rows=23 width=44) (actual time=0.028..0.039 rows=2 loops=1)
   ->  Seq Scan on public.parent  (cost=0.00..0.00 rows=1 width=44) (actual time=0.011..0.011 rows=0 loops=1)
         Output: parent.id, parent.childname, parent.range
         Filter: (parent.range = ANY ('{1,199999}'::bigint[]))
   ->  Seq Scan on public.child1  (cost=0.00..24.12 rows=11 width=44) (actual time=0.015..0.016 rows=1 loops=1)
         Output: child1.id, child1.childname, child1.range
         Filter: (child1.range = ANY ('{1,199999}'::bigint[]))
   ->  Seq Scan on public.child2  (cost=0.00..24.12 rows=11 width=44) (actual time=0.008..0.009 rows=1 loops=1)
         Output: child2.id, child2.childname, child2.range
         Filter: (child2.range = ANY ('{1,199999}'::bigint[]))
 Planning Time: 1.433 ms
 Execution Time: 0.082 ms
(12 rows)

10000 postgres@postgres=# show constraint_exclusion ;
 constraint_exclusion 
----------------------
 partition
(1 row)

PostgreSQL bỏ qua tìm kiếm dữ liệu dựa vào ràng buộc CHECK thông qua tham số constraint_exclusion. Nếu tham số này thiết lập là on hoặc partition, PostgreSQL sẽ sử dụng ràng buộc CHECK để bỏ qua tìm kiếm ở bảng con không cần thiết.
Ví dụ bên dưới khi set constraint_exclusion sang off, PostgreSQL scan tất cả các bảng con.

10000 postgres@postgres=# set constraint_exclusion TO off;
SET
10000 postgres@postgres=# EXPLAIN (ANALYZE,VERBOSE) SELECT * FROM parent WHERE range IN (1,199999);
                                                   QUERY PLAN                                                   
----------------------------------------------------------------------------------------------------------------
 Append  (cost=0.00..72.55 rows=34 width=44) (actual time=0.021..0.053 rows=2 loops=1)
   ->  Seq Scan on public.parent  (cost=0.00..0.00 rows=1 width=44) (actual time=0.006..0.006 rows=0 loops=1)
         Output: parent.id, parent.childname, parent.range
         Filter: (parent.range = ANY ('{1,199999}'::bigint[]))
   ->  Seq Scan on public.child1  (cost=0.00..24.12 rows=11 width=44) (actual time=0.013..0.014 rows=1 loops=1)
         Output: child1.id, child1.childname, child1.range
         Filter: (child1.range = ANY ('{1,199999}'::bigint[]))
   ->  Seq Scan on public.child2  (cost=0.00..24.12 rows=11 width=44) (actual time=0.007..0.007 rows=1 loops=1)
         Output: child2.id, child2.childname, child2.range
         Filter: (child2.range = ANY ('{1,199999}'::bigint[]))
   ->  Seq Scan on public.child3  (cost=0.00..24.12 rows=11 width=44) (actual time=0.022..0.022 rows=0 loops=1)
         Output: child3.id, child3.childname, child3.range
         Filter: (child3.range = ANY ('{1,199999}'::bigint[]))
         Rows Removed by Filter: 1
 Planning Time: 0.299 ms
 Execution Time: 0.128 ms
(16 rows)

UPDATE dữ liệu

Như ví dụ bên dưới vì ta chưa tạo TRIGGER khi UPDATE bảng master. Nên dữ liệu UPDATE không nằm trong khoảng của ràng buộc CHECK sẽ gây ra lỗi. Nếu muốn khắc phục lỗi này ta phải định nghĩa thêm TRIGGER thực hiện điều hướng dữ liệu UPDATE tới các bảng con tương ứng.

10000 postgres@postgres=# UPDATE parent SET range = 200000 WHERE range = 1;
ERROR:  new row for relation "child1" violates check constraint "child1_range_check"
DETAIL:  Failing row contains (1, a, 200000).
10000 postgres@postgres=# UPDATE parent SET range = 2 WHERE range = 1;
UPDATE 1
10000 postgres@postgres=# 

Declarative Partitioning (PostgreSQL 10 ~)

Nếu như ta phải thực hiện nhiều thao tác mới sử dụng được chức năng Partitioning sử dụng kế thừa như trên, thì từ phiên bản 10 ta chỉ đơn giản thực hiện các thao tác bên dưới là có thể sử dụng được.

  1. Tạo bảng master với tuỳ chọn partitioning
  2. Tạo bảng con tương ứng cho bảng master

Tạo bảng master Declarative Partitioning

Chức năng Declarative Partitioning hỗ trợ các phương thức partitioning như sau:

  • range (PostgreSQL 10~) Chỉ định phạm vi giá trị cho cột khoá của mỗi bảng con
  • list (PostgreSQL 10~) Chỉ định danh sách giá trị cho cột khoá của mỗi bảng con
  • hash (PostgreSQL 11~)
    Sử dụng hash để chỉ định giá trị cho cột khoá của mỗi bảng con

Ví dụ bên dưới mình sử dụng phương thức range (tương ứng với ví dụ ở chức năng partitioning sử dụng kế thừa).

10000 postgres@postgres=# CREATE TABLE parent_pg10(id integer, name text, range bigint) PARTITION BY RANGE (range);
CREATE TABLE

Tạo bảng con tương ứng cho bảng master

10000 postgres@postgres=# CREATE TABLE child1_pg10 PARTITION OF parent_pg10 FOR VALUES FROM (0) TO (99999) ;
CREATE TABLE
10000 postgres@postgres=# CREATE TABLE child2_pg10 PARTITION OF parent_pg10 FOR VALUES FROM (99999) TO (200000) ;
CREATE TABLE
10000 postgres@postgres=# CREATE TABLE child3_pg10 PARTITION OF parent_pg10 FOR VALUES FROM (200000) TO (9223372036854775807) ;
CREATE TABLE

Sau khi tạo được bảng con. Bảng master sẽ có cấu trúc như bên dưới.

10000 postgres@postgres=# \d+ parent_pg10
                                Table "public.parent_pg10"
 Column |  Type   | Collation | Nullable | Default | Storage  | Stats target | Description 
--------+---------+-----------+----------+---------+----------+--------------+-------------
 id     | integer |           |          |         | plain    |              | 
 name   | text    |           |          |         | extended |              | 
 range  | bigint  |           |          |         | plain    |              | 
Partition key: RANGE (range)
Partitions: child1_pg10 FOR VALUES FROM ('0') TO ('99999'),
            child2_pg10 FOR VALUES FROM ('99999') TO ('200000'),
            child3_pg10 FOR VALUES FROM ('200000') TO ('9223372036854775807')

Thực hiện truy vấn

INSERT & SELECT dữ liệu

Ví dụ bên dưới INSERT 3 dòng dữ liệu thông qua bảng master và xác nhận dữ liệu đã được ghi vào các bảng con nhờ chức năng Declarative Partitioning.

10000 postgres@postgres=# INSERT INTO parent_pg10 VALUES (1,'a',1), (2,'b',199999), (3,'c',200000);
INSERT 0 3
10000 postgres@postgres=# SELECT * FROM parent_pg10 ;
 id | name | range  
----+------+--------
  1 | a    |      1
  2 | b    | 199999
  3 | c    | 200000
(3 rows)

10000 postgres@postgres=# SELECT * FROM child1_pg10 ;
 id | name | range 
----+------+-------
  1 | a    |     1
(1 row)

10000 postgres@postgres=# SELECT * FROM child2_pg10 ;
 id | name | range  
----+------+--------
  2 | b    | 199999
(1 row)

10000 postgres@postgres=# SELECT * FROM child3_pg10 ;
 id | name | range  
----+------+--------
  3 | c    | 200000
(1 row)

Như kết quả EXPLAIN của câu lệnh SELECT bảng master bên dưới. Mặc định dữ liệu được tìm kiếm qua các bảng con chứa dữ liệu tương ứng (bảng master không chứa dữ liệu).

10000 postgres@postgres=# EXPLAIN (ANALYZE,VERBOSE) SELECT * FROM parent_pg10 WHERE range IN (1,199999);
                                                     QUERY PLAN                                                      
---------------------------------------------------------------------------------------------------------------------
 Append  (cost=0.00..48.36 rows=22 width=44) (actual time=0.028..0.041 rows=2 loops=1)
   ->  Seq Scan on public.child1_pg10  (cost=0.00..24.12 rows=11 width=44) (actual time=0.027..0.028 rows=1 loops=1)
         Output: child1_pg10.id, child1_pg10.name, child1_pg10.range
         Filter: (child1_pg10.range = ANY ('{1,199999}'::bigint[]))
   ->  Seq Scan on public.child2_pg10  (cost=0.00..24.12 rows=11 width=44) (actual time=0.010..0.010 rows=1 loops=1)
         Output: child2_pg10.id, child2_pg10.name, child2_pg10.range
         Filter: (child2_pg10.range = ANY ('{1,199999}'::bigint[]))
 Planning Time: 1.352 ms
 Execution Time: 0.099 ms
(9 rows)

Cũng giống với chức năng partitioning sử dụng kết thừa. Sau khi set tham số constraint_exclusion sang off, dữ liệu được tìm kiếm trên tất cả các bảng.

Ở phiên bản PostgreSQL 11, PostgreSQL không sử dụng exclusion constraint cho việc loại trừ tìm kiếm dữ liệu bảng con không cần thiết (prunning), nên tham số constraint_exclusion không có hiệu lực, thay vào đó ta sử dụng tham số enable_partition_pruning.

10000 postgres@postgres=# set constraint_exclusion to off;
SET
10000 postgres@postgres=# set constraint_EXPLAIN (ANALYZE,VERBOSE) SELECT * FROM parent_pg10 WHERE range IN (1,199999);
                                                     QUERY PLAN                                                      
---------------------------------------------------------------------------------------------------------------------
 Append  (cost=0.00..26.15 rows=13 width=44) (actual time=0.017..0.046 rows=2 loops=1)
   ->  Seq Scan on public.child1_pg10  (cost=0.00..1.01 rows=1 width=44) (actual time=0.016..0.017 rows=1 loops=1)
         Output: child1_pg10.id, child1_pg10.name, child1_pg10.range
         Filter: (child1_pg10.range = ANY ('{1,199999}'::bigint[]))
   ->  Seq Scan on public.child2_pg10  (cost=0.00..1.01 rows=1 width=44) (actual time=0.007..0.007 rows=1 loops=1)
         Output: child2_pg10.id, child2_pg10.name, child2_pg10.range
         Filter: (child2_pg10.range = ANY ('{1,199999}'::bigint[]))
   ->  Seq Scan on public.child3_pg10  (cost=0.00..24.12 rows=11 width=44) (actual time=0.020..0.020 rows=0 loops=1)
         Output: child3_pg10.id, child3_pg10.name, child3_pg10.range
         Filter: (child3_pg10.range = ANY ('{1,199999}'::bigint[]))
         Rows Removed by Filter: 1
 Planning time: 0.278 ms
 Execution time: 0.090 ms
(13 rows)

UPDATE dữ liệu

  • Ở phiên bản PostgreSQL 10, cũng giống như với partitioning sử dụng kế thừa, câu lệnh UPDATE thất bại nếu dữ liệu mới cho cột key nằm ở partition khác.
10000 postgres@postgres=# UPDATE parent_pg10 SET range = 200001 WHERE range = 1;
ERROR:  new row for relation "child1_pg10" violates partition constraint
DETAIL:  Failing row contains (1, a, 200001).
  • Ở phiên bản PostgreSQL 11, hạn chế bên trên đã được loại bỏ, dữ liệu tự động điều hướng sang partition tương ứng.
11000 postgres@postgres=# UPDATE parent_pg10 SET range = 200001 WHERE range = 1;
UPDATE 1
11000 postgres@postgres=# SELECT * FROM child3_pg10 ;
 id | name | range  
----+------+--------
  3 | c    | 200000
  1 | a    | 200001
(2 rows)

Ở trường hợp dữ liệu đồng thời được update trên một cột key, có thể xảy ra lỗi, vui lòng xem mục hạn chế ở cuối bài viết này.

Performance

Như ví dụ bên dưới. Do có overhead bởi TRIGGER, Performance của INSERT giảm rõ rệt (~10 lần) khi sử dụng phương thức partitioning sử dụng kế thừa.

  • Kết quả EXPLAIN sử dụng phương thức partitioning sử dụng kế thừa.
10000 postgres@postgres=# EXPLAIN (ANALYZE,VERBOSE) INSERT INTO parent SELECT generate_series(1,999999),'CHILD', random()*10000000;
                                                         QUERY PLAN                                                         
----------------------------------------------------------------------------------------------------------------------------
 Insert on public.parent  (cost=0.00..17.52 rows=1000 width=44) (actual time=33340.724..33340.724 rows=0 loops=1)
   ->  Subquery Scan on "*SELECT*"  (cost=0.00..17.52 rows=1000 width=44) (actual time=0.008..1278.986 rows=999999 loops=1)
         Output: "*SELECT*".generate_series, 'CHILD'::text, "*SELECT*"."?column?_1"
         ->  ProjectSet  (cost=0.00..5.02 rows=1000 width=44) (actual time=0.005..692.425 rows=999999 loops=1)
               Output: generate_series(1, 999999), NULL::unknown, (random() * '10000000'::double precision)
               ->  Result  (cost=0.00..0.01 rows=1 width=0) (actual time=0.001..0.001 rows=1 loops=1)
 Planning Time: 0.076 ms
 Trigger insert_to_child_tg: time=31178.106 calls=999999
 Execution Time: 33340.757 ms
(9 rows)
  • Kết quả EXPLAIN sử dụng phương thức Declarative Partitioning.
10000 postgres@postgres=# EXPLAIN (ANALYZE,VERBOSE) INSERT INTO parent_pg10 SELECT generate_series(1,999999),'CHILD', random()*10000000;
                                                        QUERY PLAN                                                         
---------------------------------------------------------------------------------------------------------------------------
 Insert on public.parent_pg10  (cost=0.00..17.52 rows=1000 width=44) (actual time=3814.105..3814.105 rows=0 loops=1)
   ->  Subquery Scan on "*SELECT*"  (cost=0.00..17.52 rows=1000 width=44) (actual time=0.011..646.356 rows=999999 loops=1)
         Output: "*SELECT*".generate_series, 'CHILD'::text, "*SELECT*"."?column?_1"
         ->  ProjectSet  (cost=0.00..5.02 rows=1000 width=44) (actual time=0.007..328.986 rows=999999 loops=1)
               Output: generate_series(1, 999999), NULL::unknown, (random() * '10000000'::double precision)
               ->  Result  (cost=0.00..0.01 rows=1 width=0) (actual time=0.001..0.002 rows=1 loops=1)
 Planning Time: 0.100 ms
 Execution Time: 3814.203 ms
(8 rows)

Một số hạn chế và chú ý liên quan tới chức năng Declarative Partitioning

  1. Không hỗ trợ Primary Key cho cột khoá
10000 postgres@postgres=# alter table child1_pg10 add primary key (range);
ERROR:  multiple primary keys for table "child1_pg10" are not allowed
  1. Không hỗ trợ khoá ngoại lai
    Không hỗ hợ Primary Key đồng nghĩa với không hỗ trợ khoá ngoại lai tham chiếu tới cột khoá.
10000 postgres@postgres=# create table grand_child(id integer, name text, range bigint references child1(range));
ERROR:  there is no unique constraint matching given keys for referenced table "child1"
  1. Cập nhật dữ liệu sang partition khác (hạn chế ở phiên bản PostgreSQL 10, đã được fixed ở phiên bản 11)
  • Ở phiên bản PostgreSQL 10, Declarative Partitioning không hỗ trợ lệnh UPDATE chuyển dữ liệu từ partition này qua partition khác.
10000 postgres@postgres=# UPDATE parent_pg10 SET range = 200001 WHERE range = 1;
ERROR:  new row for relation "child1_pg10" violates partition constraint
DETAIL:  Failing row contains (1, a, 200001).
  • Phiên bản PostgreSQL 11 đã loại bỏ được hạn chế bên trên, nhưng nếu dữ liệu đang được chuyển qua partition khác, cùng lúc đó có lệnh UPDATE đối với dữ liệu tương ứng sẽ có thể xảy ra lỗi như bên dưới.
11000 postgres@postgres=#* update parent_pg10 SET range = 1000;
ERROR:  tuple to be updated was already moved to another partition due to concurrent update
  1. Không hỗ trợ ON CONFLICT (hạn chế ở phiên bản PostgreSQL 10, đã được fixed ở phiên bản 11)
  • Ở phiên bản 10 Declarative Partitioning không hỗ trợ cấu trúc ON CONFLICT.
10000 postgres@postgres=# insert into parent_pg10 values(1,'a',1) on conflict do nothing;
ERROR:  ON CONFLICT clause is not supported with partitioned tables
  • Hạn chế này đã được fixed tại phiên bản 11.
11000 postgres@postgres=#* into parent_pg10 values(1,'a',1) on conflict do nothing;
INSERT 0 0
  1. TRIGGER mức độ dòng dữ liệu phải được định nghĩa ở bảng con, vì bảng cha không chứa dữ liệu.

  2. Bảng con của một bảng master không thể có cả bảng cố định và bảng tạm thời (temp table).

11000 postgres@postgres=# CREATE temp TABLE child3_pg11 PARTITION OF parent_pg10 FOR VALUES FROM (200000) TO (9223372036854775807) ;
ERROR:  cannot create a temporary relation as partition of permanent relation "parent_pg10"
  1. Không hỗ trợ full cho postgres_fdw (hạn chế ở phiên bản PostgreSQL 10, đã được fixed ở phiên bản 11).

Ta có thể sử dụng chức năng partitioning table kết hợp với postgres_fdw để scale out hệ thống như bên dưới ở phiên bản PostgreSQL 11.
Ở phiên bản 10 có thể cấu hình được hệ thống bên dưới, nhưng hệ thống chưa hỗ trợ hoàn toàn các câu lệnh SQL cho postgres_fdw.
Hệ thống ví dụ bên dưới, sử dụng chức năng partitioning với 2 bảng con, 2 bảng con này tiếp tục được đồng bộ sang các DB install khác thông qua chức năng postgres_fdw.

===========================================
DB install 1:         Bảng master
                           |
                   +- partitioning -+
                   |                |
               bảng con 1      bảng con 2
                   |                |
===================+==postgres_fdw==+======
DB install 2:      |                |
               bảng con 1           |
                   |                |
===================+==postgres_fdw==+======
DB install 3:                       |
                               bảng con 2
                                    |
===========================================

Những thay đổi ở phiên bản PostgreSQL 11

Ở phiên bản PostgreSQL 11, có 3 cải thiện chính như bên dưới.

Faster partition pruning

Ở phiên bản 10 PostgreSQL sử dụng constraint_exclusion để bỏ qua partition không cần thiết. Việc loại bỏ này thực hiện bởi sử dụng giá trị ở WHERE clause rồi so sánh với các metadata của từng partition. Phiên bản 11 không sử dụng constraint_exclusion nữa mà thực hiện tìm kiếm trực tiếp tới partition cần thiết làm tăng performance.

Partition Pruning at Execution Time

Phiên bản 10 thực hiện bỏ qua partition không cần thiết (prunning) ở giai đoạn planning. Nếu chỉ thực hiện ở giai đoạn này, PostgreSQL sẽ không thể thực hiện prunning được những câu lệnh có truy vấn phụ như ví dụ bên dưới.

  • Ở phiên bản 10, PostgreSQL thực hiện scan trên tất cả các bảng con khi biểu thức tìm kiếm là một truy vấn phụ vì truy vấn chưa được thực thi ở giai đoạn planning.
10000 postgres@postgres=# explain (analyze, verbose) select * from parent_pg10 where range = (select id from temp);
                                                        QUERY PLAN                                                         
---------------------------------------------------------------------------------------------------------------------------
 Append  (cost=35.50..19111.50 rows=3 width=18) (actual time=210.733..210.733 rows=0 loops=1)
   InitPlan 1 (returns $0)
     ->  Seq Scan on public.temp  (cost=0.00..35.50 rows=2550 width=4) (actual time=0.006..0.007 rows=1 loops=1)
           Output: temp.id
   ->  Seq Scan on public.child1_pg10  (cost=0.00..192.64 rows=1 width=18) (actual time=3.033..3.033 rows=0 loops=1)
         Output: child1_pg10.id, child1_pg10.name, child1_pg10.range
         Filter: (child1_pg10.range = $0)
         Rows Removed by Filter: 10051
   ->  Seq Scan on public.child2_pg10  (cost=0.00..192.30 rows=1 width=18) (actual time=2.420..2.420 rows=0 loops=1)
         Output: child2_pg10.id, child2_pg10.name, child2_pg10.range
         Filter: (child2_pg10.range = $0)
         Rows Removed by Filter: 10024
   ->  Seq Scan on public.child3_pg10  (cost=0.00..18691.06 rows=1 width=18) (actual time=205.277..205.277 rows=0 loops=1)
         Output: child3_pg10.id, child3_pg10.name, child3_pg10.range
         Filter: (child3_pg10.range = $0)
         Rows Removed by Filter: 979925
 Planning time: 0.287 ms
 Execution time: 210.785 ms
(18 rows)
  • PostgreSQL 11 thực hiện prunning khi thực thi truy vấn. Nên có thể đối ứng cả truy vấn phụ.
11000 postgres@postgres=# explain (analyze, verbose) select * from parent_pg10 where range = (select id from temp);
                                                     QUERY PLAN                                                      
---------------------------------------------------------------------------------------------------------------------
 Append  (cost=35.50..18906.51 rows=3 width=18) (actual time=6.997..6.997 rows=0 loops=1)
   InitPlan 1 (returns $0)
     ->  Seq Scan on public.temp  (cost=0.00..35.50 rows=2550 width=4) (actual time=0.799..0.801 rows=1 loops=1)
           Output: temp.id
   ->  Seq Scan on public.child1_pg10  (cost=0.00..190.64 rows=1 width=18) (actual time=6.157..6.157 rows=0 loops=1)
         Output: child1_pg10.id, child1_pg10.name, child1_pg10.range
         Filter: (child1_pg10.range = $0)
         Rows Removed by Filter: 10051
   ->  Seq Scan on public.child2_pg10  (cost=0.00..189.30 rows=1 width=18) (never executed)
         Output: child2_pg10.id, child2_pg10.name, child2_pg10.range
         Filter: (child2_pg10.range = $0)
   ->  Seq Scan on public.child3_pg10  (cost=0.00..18491.06 rows=1 width=18) (never executed)
         Output: child3_pg10.id, child3_pg10.name, child3_pg10.range
         Filter: (child3_pg10.range = $0)
 Planning Time: 0.377 ms
 Execution Time: 7.052 ms
(16 rows)

Như đã nói ở trên. Do PostgreSQL 10 không sử dụng exclusion constraint để bỏ qua partition không cần thiết, nên tham số constraint_exclusion không có hiệu lực đối với Declarative Partitioning trên phiên bản 11, thay vào đó là parameter enable_partition_pruning (mặc định là on).

Hỗ trợ hash partitioning

Ngoài kiểu range và list ở PostgreSQL 10, PostgreSQL 11 hỗ trợ thêm partitioning kiểu hash.
Thông qua hàm hash của PostgreSQL, dữ liệu INSERT vào cột khoá (cột partitioning) sẽ được điều hướng tới bảng con tương ứng.

Ví dụ:

  • Tạo bảng master
11000 postgres@postgres=# create table parent_hash(id name, child text, hashval text) partition by hash (hashval);
CREATE TABLE
  • Tạo bảng con
    Modulus có thể hiểu là số lượng partition cho bảng master. Remainder là số dư khi chia hash của giá trị INSERT vào cho số Modulus tương ứng.
11000 postgres@postgres=# create table child1_hash partition of parent_hash for values with (modulus 3, remainder 0);
CREATE TABLE
11000 postgres@postgres=# create table child2_hash partition of parent_hash for values with (modulus 3, remainder 1);
CREATE TABLE
11000 postgres@postgres=# create table child3_hash partition of parent_hash for values with (modulus 3, remainder 2);
CREATE TABLE
  • Thực hiện truy vấn
11000 postgres@postgres=# explain (analyze, verbose) insert into parent_hash select generate_series(1,10000000),'child',random()::text;
                                                           QUERY PLAN                                                           
--------------------------------------------------------------------------------------------------------------------------------
 Insert on public.parent_hash  (cost=0.00..20.02 rows=1000 width=128) (actual time=66464.827..66464.827 rows=0 loops=1)
   ->  Subquery Scan on "*SELECT*"  (cost=0.00..20.02 rows=1000 width=128) (actual time=0.024..23043.207 rows=10000000 loops=1)
         Output: "*SELECT*".generate_series, 'child'::text, "*SELECT*".random
         ->  ProjectSet  (cost=0.00..5.03 rows=1000 width=68) (actual time=0.018..16336.944 rows=10000000 loops=1)
               Output: generate_series(1, 10000000), NULL::unknown, (random())::text
               ->  Result  (cost=0.00..0.01 rows=1 width=0) (actual time=0.002..0.002 rows=1 loops=1)
 Planning Time: 0.091 ms
 Execution Time: 66466.265 ms
(8 rows)
11000 postgres@postgres=# \d+ parent_hash 
                               Table "public.parent_hash"
 Column  | Type | Collation | Nullable | Default | Storage  | Stats target | Description 
---------+------+-----------+----------+---------+----------+--------------+-------------
 id      | name |           |          |         | plain    |              | 
 child   | text |           |          |         | extended |              | 
 hashval | text |           |          |         | extended |              | 
Partition key: HASH (hashval)
Partitions: child1_hash FOR VALUES WITH (modulus 3, remainder 0),
            child2_hash FOR VALUES WITH (modulus 3, remainder 1),
            child3_hash FOR VALUES WITH (modulus 3, remainder 2)

11000 postgres@postgres=# select count(*) from child1_hash;
  count  
---------
 3332642
(1 row)

11000 postgres@postgres=# select count(*) from child2_hash;
  count  
---------
 3333466
(1 row)

11000 postgres@postgres=# select count(*) from child3_hash;
  count  
---------
 3333892
(1 row)

11000 postgres@postgres=# select count(*) from only parent_hash;
 count 
-------
     0
(1 row)

-- Dữ liệu được tìm kiếm ở bảng tương ứng (public.child1_hash)
11000 postgres@postgres=# explain (analyze, verbose) select * from parent_hash where hashval = '0.413760441355407';
                                                                QUERY PLAN                                                                
------------------------------------------------------------------------------------------------------------------------------------------
 Gather  (cost=1000.00..74228.30 rows=1 width=88) (actual time=1.003..522.970 rows=1 loops=1)
   Output: child1_hash.id, child1_hash.child, child1_hash.hashval
   Workers Planned: 2
   Workers Launched: 2
   ->  Parallel Append  (cost=0.00..73228.20 rows=1 width=88) (actual time=342.915..516.902 rows=0 loops=3)
         Worker 0: actual time=514.096..514.096 rows=0 loops=1
         Worker 1: actual time=514.136..514.136 rows=0 loops=1
         ->  Parallel Seq Scan on public.child1_hash  (cost=0.00..73228.19 rows=1 width=88) (actual time=342.908..516.894 rows=0 loops=3)
               Output: child1_hash.id, child1_hash.child, child1_hash.hashval
               Filter: (child1_hash.hashval = '0.413760441355407'::text)
               Rows Removed by Filter: 1110880
               Worker 0: actual time=514.088..514.088 rows=0 loops=1
               Worker 1: actual time=514.127..514.127 rows=0 loops=1
 Planning Time: 1.810 ms
 Execution Time: 526.021 ms
(15 rows)

--chưa hỗ trợ LIKE clause (dữ liệu không được prunning)  
11000 postgres@postgres=# explain (analyze, verbose) select * from parent_hash where hashval like '%41376044135%';
                                                                 QUERY PLAN                                                                 
--------------------------------------------------------------------------------------------------------------------------------------------
 Gather  (cost=1000.00..220838.95 rows=1002 width=88) (actual time=2.684..1956.412 rows=1 loops=1)
   Output: child2_hash.id, child2_hash.child, child2_hash.hashval
   Workers Planned: 2
   Workers Launched: 2
   ->  Parallel Append  (cost=0.00..219738.75 rows=417 width=88) (actual time=1298.137..1949.377 rows=0 loops=3)
         Worker 0: actual time=1945.537..1945.537 rows=0 loops=1
         Worker 1: actual time=1946.631..1946.631 rows=0 loops=1
         ->  Parallel Seq Scan on public.child2_hash  (cost=0.00..73259.59 rows=139 width=88) (actual time=655.334..655.334 rows=0 loops=3)
               Output: child2_hash.id, child2_hash.child, child2_hash.hashval
               Filter: (child2_hash.hashval ~~ '%41376044135%'::text)
               Rows Removed by Filter: 1111155
               Worker 0: actual time=9.694..9.694 rows=0 loops=1
               Worker 1: actual time=1946.623..1946.623 rows=0 loops=1
         ->  Parallel Seq Scan on public.child3_hash  (cost=0.00..73248.88 rows=139 width=88) (actual time=968.696..968.696 rows=0 loops=2)
               Output: child3_hash.id, child3_hash.child, child3_hash.hashval
               Filter: (child3_hash.hashval ~~ '%41376044135%'::text)
               Rows Removed by Filter: 1666946
               Worker 0: actual time=1935.832..1935.832 rows=0 loops=1
         ->  Parallel Seq Scan on public.child1_hash  (cost=0.00..73228.19 rows=139 width=88) (actual time=2.242..1944.713 rows=1 loops=1)
               Output: child1_hash.id, child1_hash.child, child1_hash.hashval
               Filter: (child1_hash.hashval ~~ '%41376044135%'::text)
               Rows Removed by Filter: 3332641
 Planning Time: 0.471 ms
 Execution Time: 1961.897 ms
(24 rows)

Kết luận

Cùng với chức năng logical replication, chức năng Declarative Partitioning được đưa vào từ phiên bản PostgreSQL 10 được coi là một bước tiến đáng kể của PostgreSQL.
Chức năng Declarative Partitioning kết hợp với postgres_fdw có thể là nền tảng cho chức năng sharding của PostgreSQL sau này.
Phiên bản 11 khắc phục khá lớn các hạn chế của Declarative Partitioning trong phiên bản 10. Mặc dù vậy cũng cần chú ý các hạn chế còn tồn đọng để thiết kết xử lý sao cho đúng với hệ thống của bạn.  

VACUUM FULL và REINDEX

Chào các bạn.
Nhân tiện có bạn hỏi về REINDEX nên mình viết bài này để giải thích thêm về REINDEX và VACUUM FULL, khi nào phải thực hiện các thao tác này và cần chú ý những gì khi sử dụng chức năng này. Trong bài viết về VACUUM, mình có giải thích về chức năng và các xử lý mà VACUUM thực hiện. But chưa nói về 2 chức năng liên quan này.
Trước khi bắt đầu giải thích về VACUUM FULL và REINDEX, mình xin trả lời trước một số nghi vấn mà lúc tiếp xúc với PostgreSQL các bạn hay gặp phải.

VACUUM có lấy lại dữ liệu phân mảnh cho INDEX không?

Câu trả lời là có. VACUUM lấy lại dữ liệu phân mảnh cho table và những index tương ứng của table đó.
But không giống với table, index không có Visibility Map(VM) nên VACUUM thực hiện scan toàn bộ file index tốn nhiều disk I/O để tìm kiếm và thực hiện lấy lại dữ liệu dư thừa. Đây cũng là một điểm bất lợi về performance của VACUUM.

Tại sao cần REINDEX hay VACUUM FULL?

Lý do chính trong vận hành khi thực hiện 2 chức năng này là để khắc phục tình trạng file dữ liệu (table hay index) bị tăng quá lớn.

Hai chức năng này khi chạy sẽ ảnh hưởng nhiều tới hệ thống. Bạn nên tham khảo kỹ chú ý ở cuối bài viết này rồi thực hiện cho đúng.

Như trong bài viết về VACUUM mình đã nói qua, PostgreSQL sử dụng cơ chế không xóa dữ liệu vật lý ngay mà chỉ đánh dấu đã xóa để thực hiện chức năng MVCC. Những dữ liệu bị đánh dấu đã xóa (dữ liệu bị phân mảnh) này, không được giải phóng ngay cả khi transaction đã COMMIT. Một trong những chức năng của VACUUM (autovacuum) là lấy lại những dữ liệu bị phân mảnh này để tái sử dụng.
Như như hình vẽ minh họa bên dưới, dữ liệu dư thừa được lấy về để tái sử dụng khi VACUUM được thực thi đúng cách. But nếu block dữ liệu hữu hiệu nằm ở cuối file thì kích thước file không được giảm.
Vấn đề trên làm cho dung lượng dư thừa không được trả về cho hệ thống. Ngoài ra nếu file dữ liệu lớn việc tìm seek dữ liệu trên đĩa cứng cũng ảnh hưởng tới performance.

Tổng quan phân cấp đối tượng trong PostgreSQL
VACUUM FULL vs VACUUM.

Ví dụ về hiệu quả của VACUUM FULL và REINDEX

  1. Tạo dữ liệu test
postgres=# create table testtbl as select generate_series(1,100000) as id, random()::text as c1;
SELECT 100000
postgres=# create index test_idx on testtbl using btree (id);
CREATE INDEX
postgres=# analyze testtbl;
ANALYZE
postgres=# select pg_relation_size('testtbl');
 pg_relation_size
------------------
          5226496
(1 row)

postgres=# select pg_relation_size('test_idx');
 pg_relation_size
------------------
          2260992
(1 row)
  1. Xóa một phần dữ liệu, để lại block dữ liệu ở cuối file và kiểm tra độ phân mảnh của table và index.
    Sau khi xóa tình dữ liệu. Tình trạng phân mảnh của table và index rõ dệt như bên dưới.

Ở đây mình sử dụng thêm contrib pgstattuple để kiểm tra độ phân mảnh của table và index.

postgres=# delete from testtbl where id < 99999;
DELETE 99998
postgres=# analyze testtbl;
ANALYZE
postgres=# select dead_tuple_percent,free_space from pgstattuple('testtbl');
 dead_tuple_percent | free_space
--------------------+------------
                 88 |       7904
(1 row)

postgres=# select avg_leaf_density,leaf_pages from pgstatindex('test_idx');
 avg_leaf_density | leaf_pages
------------------+------------
            89.83 |        274
(1 row)
  1. VACUUM và kiểm tra dung lượng file và độ phân mảnh.
    Như kết quả bên dưới, tình trạng phân mảnh đã được phục hồi (đã lấy lại dữ liệu dư thừa) but dung lượng file không thay đổi.
postgres=# vacuum testtbl;
VACUUM
postgres=# select pg_relation_size('testtbl');
 pg_relation_size
------------------
          5226496
(1 row)

postgres=# select pg_relation_size('test_idx');
 pg_relation_size
------------------
          2260992
(1 row)

postgres=# select dead_tuple_percent,free_space from pgstattuple('testtbl');
 dead_tuple_percent | free_space
--------------------+------------
                  0 |    4808536
(1 row)

postgres=# select avg_leaf_density,leaf_pages from pgstatindex('test_idx');
 avg_leaf_density | leaf_pages
------------------+------------
             0.54 |          1
(1 row)
  1. Tiếp tục INSERT dữ liệu.
    Dữ liệu khi INSERT sử dụng được vùng block thừa vừa được thu hồi nên dung lượng file table không thay đổi, but do cấu tạo của INDEX mặc dù dữ liệu thừa đã được thu hồi (do chưa tối ưu được cách sử dụng?) nên file index vẫn tăng lên một chút.
postgres=# insert into testtbl select generate_series(1,2000),random()::text;
INSERT 0 2000
postgres=# analyze testtbl;
ANALYZE
postgres=# select pg_relation_size('testtbl');
 pg_relation_size
------------------
          5226496
(1 row)

postgres=# select pg_relation_size('test_idx');
 pg_relation_size
------------------
          2301952
(1 row)

postgres=# select dead_tuple_percent,free_space from pgstattuple('testtbl');
 dead_tuple_percent | free_space
--------------------+------------
                  0 |    4712512
(1 row)

postgres=# select avg_leaf_density,leaf_pages from pgstatindex('test_idx');
 avg_leaf_density | leaf_pages
------------------+------------
            82.11 |          6
(1 row)
  1. Khi VACUUM FULL được thực hiện
    Dung lượng cả file index và file table đều giảm về dung lượng dữ liệu thực.
postgres=# vacuum full testtbl;
VACUUM
postgres=# select pg_relation_size('testtbl');
 pg_relation_size
------------------
           106496
(1 row)

postgres=# select pg_relation_size('test_idx');
 pg_relation_size
------------------
            65536
(1 row)

postgres=# select dead_tuple_percent,free_space from pgstattuple('testtbl');
 dead_tuple_percent | free_space
--------------------+------------
                  0 |       2012
(1 row)

postgres=# select avg_leaf_density,leaf_pages from pgstatindex('test_idx');
 avg_leaf_density | leaf_pages
------------------+------------
            82.11 |          6
(1 row)
  1. Tạo lại dữ liệu test (Xác nhận hiệu quả của REINDEX).
postgres=# truncate testtbl;
TRUNCATE TABLE
postgres=# insert into testtbl select generate_series(1,100000), random()::text;
INSERT 0 100000
  1. Sau khi xóa dữ liệu. Dung lượng file index không thay đổi.
postgres=# delete from testtbl where id < 99999;
DELETE 99998
postgres=# analyze testtbl;
ANALYZE
postgres=# select pg_relation_size('testtbl');
 pg_relation_size
------------------
          5226496
(1 row)

postgres=# select pg_relation_size('test_idx');
 pg_relation_size
------------------
          2260992
(1 row)
  1. Sau REINDEX Dung lượng file index trở về kích thước dữ liệu thực.
postgres=# reindex index test_idx;
REINDEX
postgres=# select pg_relation_size('testtbl');
 pg_relation_size
------------------
          5226496
(1 row)

postgres=# select pg_relation_size('test_idx');
 pg_relation_size
------------------
            16384
(1 row)

postgres=#

REINDEX

Là chức năng tạo lại file index. Thực tế, chức năng này thường được sử dụng trong những trường hợp bên dưới.

  • Khắc phục tình trạng file index trở nên quá lớn trong vận hành. Như giải thích bên trên.
  • Khi index bị hỏng (thường không xảy ra, but như trường hợp bug của PostgreSQL).
  • Khi thay đổi định nghĩa về INDEX (ví dụ fillfactor) bằng câu lệnh ALTER INDEX.

REINDEX có thể thực hiện bằng lệnh SQL REINDEX hoặc câu lệnh binary reindexdb. Tùy vào cú pháp mà ta có thể thay đổi phạm vi thực hiện REINDEX.

  • Cú pháp thực hiện REINDEX (lệnh SQL)
postgres=# \h reindex
Command:     REINDEX
Description: rebuild indexes
Syntax:
REINDEX [ ( VERBOSE ) ] { INDEX | TABLE | SCHEMA | DATABASE | SYSTEM } name
  • Cú pháp reindexdb
$ reindexdb --help
reindexdb reindexes a PostgreSQL database.

Usage:
  reindexdb [OPTION]... [DBNAME]

Options:
  -a, --all                 reindex all databases
  -d, --dbname=DBNAME       database to reindex
  -e, --echo                show the commands being sent to the server
  -i, --index=INDEX         recreate specific index(es) only
  -q, --quiet               don't write any messages
  -s, --system              reindex system catalogs
  -S, --schema=SCHEMA       reindex specific schema(s) only
  -t, --table=TABLE         reindex specific table(s) only
  -v, --verbose             write a lot of output
  -V, --version             output version information, then exit
  -?, --help                show this help, then exit
... còn nữa

VACUUM FULL

Là một chức năng của VACUUM. Ngoài chức năng VACUUM thông thường, VACUUM FULL thực hiện tạo lại file table và những index liên quan tới table tương ứng đó.
VACUUM FULL có thể thực hiện bằng lệnh SQL hoặc câu lệnh binary vacuumdb -f. Tùy vào cú pháp mà ta có thể thay đổi phạm vi thực hiện VACUUM FULL.

  • Cú pháp VACUUM FULL (Lệnh SQL).
postgres=# \h vacuum
Command:     VACUUM
Description: garbage-collect and optionally analyze a database
Syntax:
VACUUM [ ( { FULL | FREEZE | VERBOSE | ANALYZE | DISABLE_PAGE_SKIPPING } [, ...] ) ] [ table_name [ (column_name [, ...] ) ] ]
VACUUM [ FULL ] [ FREEZE ] [ VERBOSE ] [ table_name ]
VACUUM [ FULL ] [ FREEZE ] [ VERBOSE ] ANALYZE [ table_name [ (column_name [, ...] ) ] ]

postgres=#
  • Cú pháp vacuumdb
$ vacuumdb --help
vacuumdb cleans and analyzes a PostgreSQL database.

Usage:
  vacuumdb [OPTION]... [DBNAME]

Options:
  -a, --all                       vacuum all databases
  -d, --dbname=DBNAME             database to vacuum
  -e, --echo                      show the commands being sent to the server
  -f, --full                      do full vacuuming
  -F, --freeze                    freeze row transaction information
  -j, --jobs=NUM                  use this many concurrent connections to vacuum
  -q, --quiet                     don't write any messages
  -t, --table='TABLE[(COLUMNS)]'  vacuum specific table(s) only
  -v, --verbose                   write a lot of output
  -V, --version                   output version information, then exit
  -z, --analyze                   update optimizer statistics
  -Z, --analyze-only              only update optimizer statistics; no vacuum
      --analyze-in-stages         only update optimizer statistics, in multiple
                                  stages for faster results; no vacuum
   ... còn nữa

Chú ý khi sử dụng REINDEX và VACUUM FULL

REINDEX và VACUUM FULL có những chú ý như bên dưới. Bạn nên tham khảo kỹ trước khi sử dụng để hệ thống/service của bạn chịu ảnh hưởng ít nhất.

Thông thường, trường hợp vận hành lâu ngày table files và index files trở nên lớn khác thường so với lượng record hiện tại ta mới sử dụng VACUUM FULL.

  • Cả VACUUM và REINDEX đều thực hiện ACCESS EXCLUSIVE lock với table tương ứng. Điều này làm cho các transaction khác không thể access (kể cả SELECT) khi đang thực hiện.
  • REINDEX và VACUUM FULL thực hiện tạo Objects(index, table) file tạm trước (sau đó xóa Objects file cũ đi), nên khi chạy cần dung lượng = 2 lần dung lượng objects (index, table) hiện tại.
  • REINDEX, VACUUM FULL tạo lại objects (index, table) file nên phát sinh Disk I/O lớn.
  • VACUUM FULL thực hiện cả việc tạo lại INDEX tương ứng của đối tượng table được chỉ định (từ phiên bản 9.0).

Các đối tượng lưu trữ dữ liệu trên PostgreSQL

Sau khi install PostgreSQL việc đầu tiên bạn phải làm là tạo ra một database cluster để thực hiện tiếp các truy vấn (SQL) khác. Để tạo một database cluster, ta sử dụng command initdb. Sau đó khởi động PostgreSQL là ta có thể bắt đầu sử dụng PostgreSQL. Bạn có băn khoăn tại sao mình lại có thể thực hiện được truy vấn, mình đang access bằng User nào truy cập vào database nào để thực hiện truy vấn, ... Bài viết này sẽ giới thiệu một số Objects chính trên PostgreSQL, cách tạo ra chúng, và cách nhìn tổng quan về các Objects lưu trữ dữ liệu trên PostgreSQL.

Một database cluster được tạo và khởi động (dựa trên thông tin bạn nhập trên wizard của installer) nếu bạn cài đặt PostgreSQL qua installer trên Windows.

Khái quát về các Objects lưu trữ trên PostgreSQL

Giống như các RDBMS khác, bảng dữ liệu là nơi PostgreSQL thực hiện lưu trữ dữ liệu. Bảng dữ liệu được lưu trữ trong đơn vị lớn hơn là database, các database nằm bên dưới đơn vị lớn nhất của PostgreSQL là database cluster. Như hình minh họa bên dưới ta còn thấy bảng dữ liệu nằm dưới schema và tablespace. Schema là đơn vị tập hợp các bảng (và một số objects khác) theo hình thức logic. Và tablespace là đơn vị của một tập hợp các bảng và indexes theo hình thức vật lý. Xin vui lòng chi xem tiết các Objects lưu trữ như bên dưới.

Tổng quan phân cấp đối tượng trong PostgreSQL
Tổng quan phân cấp đối tượng trong PostgreSQL.

Các đối tương lưu trữ trong PostgreSQL
Các đối tương lưu trữ trong PostgreSQL.

Database cluster

Là đơn vị lưu trữ lớn nhất của một PostgreSQL database server. Database cluster được tạo ra bởi câu lệnh initdb, bao gồm các files config (postgresql.conf, pg_hba.conf, ...), và tất cả các đối tượng lưu trữ đều nằm trong database cluster. Xin vui lòng xem chi tiết trong bài viết Cấu trúc thư mục PostgreSQL.

Có thể cài đặt nhiều PostgreSQL database server trên một hệ điều hành, bằng cách chỉ định các port (thiết lập trong $PGDATA/postgresql.conf) khác nhau cho mỗi server.

Database

Là đơn vị lớn sau Database cluster. Để thực hiện được câu truy vấn, bạn phải truy cập vào một database nào đó. Mặc định sau khi tạo database cluster, PostgreSQL tạo ra 3 database như bên dưới.

 
$ psql
Timing is on.
psql (10.3)
Type "help" for help.

10300 postgres@postgres=# \l
                         List of databases
   Name    | Owner | Encoding | Collate | Ctype | Access privileges 
-----------+-------+----------+---------+-------+-------------------
 postgres  | bocap | UTF8     | C       | C     | 
 template0 | bocap | UTF8     | C       | C     | =c/bocap         +
           |       |          |         |       | bocap=CTc/bocap
 template1 | bocap | UTF8     | C       | C     | =c/bocap         +
           |       |          |         |       | bocap=CTc/bocap
(3 rows)

Tên Database Mục Đích sử dụng
template0 Là template database. Không thể truy nhập và chỉnh sửa các đối tượng trong đó. Người dùng có thể tạo database mới dựa trên template0 này bằng cách chỉ định TEMPLATE trong câu lệnh "CREATE DATABASE"
template1 Là một template database. Người dùng có thể truy nhập và chỉnh sửa các đối tượng trong đó. Khi thực hiện câu lệnh "CREATE DATABASE", PostgreSQL sẽ copy template1 này để tạo database mới.
postgres database mặc định của PostgreSQL khi tạo database cluster.

PostgreSQL cũng như các RDBMS khác, để truy nhập một database. Ta cần thông tin: tên database, tên user, password(ở chứng thực trust thì bạn không cần), số port (cho từng database cluster), hostname or IP address.

Để tạo một database ta sử dụng câu lệnh SQL "CREATE DATABASE", hoặc sử dụng createdb từ installer.

Khác với Oracle, PostgreSQL mặc định đối tượng câu lệnh SQL là chữ thường. Nếu muốn chữ in hoa vui lòng viết đối tượng trong dấu "".

  • Tạo database từ câu lệnh SQL
  1. Cú pháp

10300 postgres@postgres=# \h CREATE DATABASE
Command:     CREATE DATABASE
Description: create a new database
Syntax:
CREATE DATABASE name
    [ [ WITH ] [ OWNER [=] user_name ]
           [ TEMPLATE [=] template ]
           [ ENCODING [=] encoding ]
           [ LC_COLLATE [=] lc_collate ]
           [ LC_CTYPE [=] lc_ctype ]
           [ TABLESPACE [=] tablespace_name ]
           [ ALLOW_CONNECTIONS [=] allowconn ]
           [ CONNECTION LIMIT [=] connlimit ]
           [ IS_TEMPLATE [=] istemplate ] ]

  1. Ví dụ

10300 postgres@postgres=# CREATE DATABASE testdb TEMPLATE template0;
CREATE DATABASE
Time: 4941.826 ms (00:04.942)
10300 postgres@postgres=# \l
                           List of databases
   Name    |  Owner   | Encoding | Collate | Ctype | Access privileges 
-----------+----------+----------+---------+-------+-------------------
 postgres  | bocap    | UTF8     | C       | C     | 
 template0 | bocap    | UTF8     | C       | C     | =c/bocap         +
           |          |          |         |       | bocap=CTc/bocap
 template1 | bocap    | UTF8     | C       | C     | =c/bocap         +
           |          |          |         |       | bocap=CTc/bocap
 testdb    | postgres | UTF8     | C       | C     | 
(4 rows)

10300 postgres@postgres=# \c testdb
You are now connected to database "testdb" as user "postgres".
10300 postgres@testdb=# \d
Did not find any relations.
10300 postgres@testdb=# \c postgres 
You are now connected to database "postgres" as user "postgres".
10300 postgres@postgres=# DROP DATABASE testdb ;
DROP DATABASE

Để hiện thị thông tin của database trên psql mode, ta sử dụng meta command \l hay \l+ (chi tiết). Muốn access vào database nào đó ta sử dụng meta command "\c database".

  • Tạo database từ câu lệnh createdb
  1. Cú pháp
 
$ createdb --help
createdb creates a PostgreSQL database.

Usage:
  createdb [OPTION]... [DBNAME] [DESCRIPTION]

Options:
  -D, --tablespace=TABLESPACE  default tablespace for the database
  -e, --echo                   show the commands being sent to the server
  -E, --encoding=ENCODING      encoding for the database
  -l, --locale=LOCALE          locale settings for the database
      --lc-collate=LOCALE      LC_COLLATE setting for the database
      --lc-ctype=LOCALE        LC_CTYPE setting for the database
  -O, --owner=OWNER            database user to own the new database
  -T, --template=TEMPLATE      template database to copy
  -V, --version                output version information, then exit
  -?, --help                   show this help, then exit

Connection options:
  -h, --host=HOSTNAME          database server host or socket directory
  -p, --port=PORT              database server port
  -U, --username=USERNAME      user name to connect as
  -w, --no-password            never prompt for password
  -W, --password               force password prompt
  --maintenance-db=DBNAME      alternate maintenance database

By default, a database with the same name as the current user is created.

  1. Ví dụ
 
[ ~]$ createdb --template=template0 testdb
[ ~]$ psql -l
Timing is on.
                           List of databases
   Name    |  Owner   | Encoding | Collate | Ctype | Access privileges 
-----------+----------+----------+---------+-------+-------------------
 postgres  | bocap    | UTF8     | C       | C     | 
 template0 | bocap    | UTF8     | C       | C     | =c/bocap         +
           |          |          |         |       | bocap=CTc/bocap
 template1 | bocap    | UTF8     | C       | C     | =c/bocap         +
           |          |          |         |       | bocap=CTc/bocap
 testdb    | postgres | UTF8     | C       | C     | 
(4 rows)

[ ~]$ dropdb testdb
[ ~]$


Schema

Là đơn vị lưu trữ bên dưới database, quản lý dữ liệu dưới dạng logic. Mặc định trong mỗi database có một schema cho người sử dụng, đó là schema public. Ta có thể tạo schema bằng câu lệnh "CREATE SCHEMA ". Đặc điểm của 1 schema như bên dưới.

  • Có thể sử dụng tên trùng với schema ở database khác but không trùng tên trên cùng database.
  • Ngoài TABLESPACE và user ra, schema có thể chứa hầu hết các đối tượng còn lại (như table, index, sequence, constraint...)
  • để truy cập schema ta có thể thêm tên schema vào phía trước đối tượng muốn truy cập hoặc sử dụng tham số search_path để thay đổi schema truy cập hiện tại.
  • Schema có thể sử dụng với các mục đích như tăng cường security, quản lý dữ liệu dễ dàng hơn.

Khác với Oracle, Schema của PostgreSQL không có liên quan tới database User.

Để tạo schema, ta phải truy cập vào một database nào đó rồi thực hiện lệnh "CREATE SCHEMA " để tạo.

  1. Cú pháp

10300 postgres@postgres=# \h CREATE SCHEMA
Command:     CREATE SCHEMA
Description: define a new schema
Syntax:
CREATE SCHEMA schema_name [ AUTHORIZATION role_specification ] [ schema_element [ ... ] ]
CREATE SCHEMA AUTHORIZATION role_specification [ schema_element [ ... ] ]
CREATE SCHEMA IF NOT EXISTS schema_name [ AUTHORIZATION role_specification ]
CREATE SCHEMA IF NOT EXISTS AUTHORIZATION role_specification

where role_specification can be:

    user_name
  | CURRENT_USER
  | SESSION_USER


  1. Ví dụ:

10300 postgres@postgres=# \dn
  List of schemas
  Name  |  Owner
--------+----------
 public | postgres
(1 row)

10300 postgres@postgres=# show search_path;
   search_path
-----------------
 "$user", public
(1 row)

10300 postgres@postgres=# create schema testscm;
CREATE SCHEMA
10300 postgres@postgres=# create table testscm.testtbl();
CREATE TABLE
10300 postgres@postgres=# \d
Did not find any relations.
10300 postgres@postgres=# set search_path to testscm ;
SET
10300 postgres@postgres=# \d
          List of relations
 Schema  |  Name   | Type  |  Owner
---------+---------+-------+----------
 testscm | testtbl | table | postgres
(1 row)

10300 postgres@postgres=# \dn
  List of schemas
  Name   |  Owner
---------+----------
 public  | postgres
 testscm | postgres
(2 rows)

10300 postgres@postgres=#


TABLESPACE

Là đơn vị lưu trữ dữ liệu về phương diện vật lý bên dưới database. Thông thường dữ liệu vật lý được lưu trữ tại thư mục dữ liệu (nơi ta chỉ định lúc ta tạo database cluster initdb -D). Nhưng có một phương pháp lưu trữ dữ liệu ngoài phân vùng này, nhờ sử dụng chức năng TABLESPACE. Khi tạo một TABLESPACE tức là ta đã tạo ra một vùng lưu trữ dữ liệu mới độc lập với dữ liệu bên dưới thư mục dữ liệu. Điều này giảm thiểu được disk I/O cho phân vùng thư mục dữ liệu (nếu trong các hệ thống cấu hình RAID, hay hệ thống có 1 đĩa cứng thì không có hiệu quả).

  1. Cú pháp

10300 postgres@postgres=# \h create tablespace
Command:     CREATE TABLESPACE
Description: define a new tablespace
Syntax:
CREATE TABLESPACE tablespace_name
    [ OWNER { new_owner | CURRENT_USER | SESSION_USER } ]
    LOCATION 'directory'
    [ WITH ( tablespace_option = value [, ... ] ) ]

10300 postgres@postgres=#
  1. Ví dụ

10300 postgres@postgres=# \! mkdir /tmp/testtablespace
10300 postgres@postgres=# create tablespace testtps location '/tmp/testtablespace';
CREATE TABLESPACE
10300 postgres@postgres=# \! ls -l /tmp/testtablespace/*
total 0
10300 postgres@postgres=# set default_tablespace to testtps;
SET
10300 postgres@postgres=# create table testtbl as select generate_series(1,10) as id;
SELECT 10
10300 postgres@postgres=# checkpoint;
CHECKPOINT
drwx------. 2 postgres postgres 18 Apr 15 13:59 13211
10300 postgres@postgres=# \! ls -l /tmp/testtablespace/*/*
total 8
-rw-------. 1 postgres postgres 8192 Apr 15 13:59 16389
10300 postgres@postgres=# select oid,* from pg_tablespace;
  oid  |  spcname   | spcowner | spcacl | spcoptions
-------+------------+----------+--------+------------
  1663 | pg_default |       10 |        |
  1664 | pg_global  |       10 |        |
 16388 | testtps    |       10 |        |
(3 rows)

10300 postgres@postgres=# \! ls -l $PGDATA/pg_tblspc/16388
lrwxrwxrwx. 1 postgres postgres 19 Apr 15 13:58 /usr/local/pgsql/pg1000/data/pg_tblspc/16388 -> /tmp/testtablespace
10300 postgres@postgres=#

PostgreSQL tạo một symblic link có tên là oid (Object ID) của tablespace vừa được tạo ở bên dưới pg_tblspc của database cluster. Trỏ tới vùng dữ liệu được chỉ định (LOCATION) trong lúc tạo tablespace.

Để chuyển đổi qua các tablespace để lưu trữ dữ liệu, ta chỉ định thông qua parameter default_tablespace trước khi tạo đối tượng (bảng hoặc index). Ngoài ra đối với bảng tạm thời (temporary table) và index của nó, để chuyển đổi vùng lưu trữ ta thiết lập tablespace cho tham số temp_tablespaces trước khi tạo đối tượng. default_tablespace và temp_tablespaces đều có giá trị mặc định là không thiết lập, tức là sử dụng tablespace mặc định bên dưới database cluster.

ví dụ trên sử dụng meta command ! của psql, meta command này thực hiện các lệnh shell bên ngoài.

Bảng(table)

Bảng là đối tượng lưu trữ dữ liệu từ người dùng. Một bảng bao gồm 0 hoặc nhiều cột (column) tương ứng với từng kiểu dữ liệu khác nhau của PostgreSQL.
Tổng quan có 3 kiểu tables mà PostgreSQL support, đó là

  • unlogged table: là kiểu table mà các thao tác đối với bảng dữ liệu này không được lưu trữ vào WAL. Tức là không có khả năng phục hồi nếu bị corrupt.
  • temporary table: là kiểu table chỉ được tạo trong phiên làm việc đó. Khi connection bị ngắt, nó sẽ tự động mất đi.
  • table thông thường: Khác với 2 kiểu table trên, là loại table thông thường để lưu trữ dữ liệu. Có khả năng phục hồi khi bị corrupt và tồn tại vĩnh viễn nếu không có thao tác xóa bỏ nào.

PostgreSQL support nhiều kiểu dữ liệu, bao gồm cả kiểu dữ liệu do người dùng định nghĩa. Để biết thêm chi tiết vui lòng  thao khảo ở đây

  1. Cú pháp tạo

postgres=# \h create table
Command:     CREATE TABLE
Description: define a new table
Syntax:
CREATE [ [ GLOBAL | LOCAL ] { TEMPORARY | TEMP } | UNLOGGED ] TABLE [ IF NOT EXISTS ] table_name ( [
  { column_name data_type [ COLLATE collation ] [ column_constraint [ ... ] ]
    | table_constraint
    | LIKE source_table [ like_option ... ] }
    [, ... ]
] )
[ INHERITS ( parent_table [, ... ] ) ]
[ PARTITION BY { RANGE | LIST } ( { column_name | ( expression ) } [ COLLATE collation ] [ opclass ] [, ... ] ) ]
[ WITH ( storage_parameter [= value] [, ... ] ) | WITH OIDS | WITHOUT OIDS ]
[ ON COMMIT { PRESERVE ROWS | DELETE ROWS | DROP } ]
[ TABLESPACE tablespace_name ]

CREATE [ [ GLOBAL | LOCAL ] { TEMPORARY | TEMP } | UNLOGGED ] TABLE [ IF NOT EXISTS ] table_name
    OF type_name [ (
  { column_name [ WITH OPTIONS ] [ column_constraint [ ... ] ]
    | table_constraint }
    [, ... ]
) ]
[ PARTITION BY { RANGE | LIST } ( { column_name | ( expression ) } [ COLLATE collation ] [ opclass ] [, ... ] ) ]
[ WITH ( storage_parameter [= value] [, ... ] ) | WITH OIDS | WITHOUT OIDS ]
[ ON COMMIT { PRESERVE ROWS | DELETE ROWS | DROP } ]
[ TABLESPACE tablespace_name ]

CREATE [ [ GLOBAL | LOCAL ] { TEMPORARY | TEMP } | UNLOGGED ] TABLE [ IF NOT EXISTS ] table_name
    PARTITION OF parent_table [ (
  { column_name [ WITH OPTIONS ] [ column_constraint [ ... ] ]
    | table_constraint }
    [, ... ]
) ] FOR VALUES partition_bound_spec
[ PARTITION BY { RANGE | LIST } ( { column_name | ( expression ) } [ COLLATE collation ] [ opclass ] [, ... ] ) ]
[ WITH ( storage_parameter [= value] [, ... ] ) | WITH OIDS | WITHOUT OIDS ]
[ ON COMMIT { PRESERVE ROWS | DELETE ROWS | DROP } ]
[ TABLESPACE tablespace_name ]

where column_constraint is:

[ CONSTRAINT constraint_name ]
{ NOT NULL |
  NULL |
  CHECK ( expression ) [ NO INHERIT ] |
  DEFAULT default_expr |
  GENERATED { ALWAYS | BY DEFAULT } AS IDENTITY [ ( sequence_options ) ] |
  UNIQUE index_parameters |
  PRIMARY KEY index_parameters |
  REFERENCES reftable [ ( refcolumn ) ] [ MATCH FULL | MATCH PARTIAL | MATCH SIMPLE ]
    [ ON DELETE action ] [ ON UPDATE action ] }
[ DEFERRABLE | NOT DEFERRABLE ] [ INITIALLY DEFERRED | INITIALLY IMMEDIATE ]

and table_constraint is:

[ CONSTRAINT constraint_name ]
{ CHECK ( expression ) [ NO INHERIT ] |
  UNIQUE ( column_name [, ... ] ) index_parameters |
  PRIMARY KEY ( column_name [, ... ] ) index_parameters |
  EXCLUDE [ USING index_method ] ( exclude_element WITH operator [, ... ] ) index_parameters [ WHERE ( predicate ) ] |
  FOREIGN KEY ( column_name [, ... ] ) REFERENCES reftable [ ( refcolumn [, ... ] ) ]
    [ MATCH FULL | MATCH PARTIAL | MATCH SIMPLE ] [ ON DELETE action ] [ ON UPDATE action ] }
[ DEFERRABLE | NOT DEFERRABLE ] [ INITIALLY DEFERRED | INITIALLY IMMEDIATE ]

and like_option is:

{ INCLUDING | EXCLUDING } { DEFAULTS | CONSTRAINTS | IDENTITY | INDEXES | STORAGE | COMMENTS | ALL }

and partition_bound_spec is:

IN ( { numeric_literal | string_literal | NULL } [, ...] ) |
FROM ( { numeric_literal | string_literal | MINVALUE | MAXVALUE } [, ...] )
  TO ( { numeric_literal | string_literal | MINVALUE | MAXVALUE } [, ...] )

index_parameters in UNIQUE, PRIMARY KEY, and EXCLUDE constraints are:

[ WITH ( storage_parameter [= value] [, ... ] ) ]
[ USING INDEX TABLESPACE tablespace_name ]

exclude_element in an EXCLUDE constraint is:

{ column_name | ( expression ) } [ opclass ] [ ASC | DESC ] [ NULLS { FIRST | LAST } ]

  1. Ví dụ:

postgres=#
postgres=# create unlogged table test_unlog_tbl as select generate_series(1,10) as id;
SELECT 10
postgres=# create temporary table test_temp_tbl as select generate_series(1,10) as id;
SELECT 10
postgres=# create table test_nomarl_tbl as select generate_series(1,10) as id;
SELECT 10
postgres=# \d
               List of relations
  Schema   |      Name       | Type  |  Owner
-----------+-----------------+-------+----------
 pg_temp_3 | test_temp_tbl   | table | postgres
 public    | test_nomarl_tbl | table | postgres
 public    | test_unlog_tbl  | table | postgres
(3 rows)

postgres=# \q
[postgres@localhost ~]$ psql
psql (10.3)
Type "help" for help.

postgres=# \d
              List of relations
 Schema |      Name       | Type  |  Owner
--------+-----------------+-------+----------
 public | test_nomarl_tbl | table | postgres
 public | test_unlog_tbl  | table | postgres
(2 rows)

postgres=#

index

Index là đối tượng chỉ mục của một cột nào đó trong bảng, đối tượng này đã được sắp xếp theo một trình tự nào đó khi được sử dụng có thể làm tăng khả năng tìm kiếm.
PostgreSQL hiện tại(tới phiên bản 10) support 6 loại index btree, hash, gist, spgist, gin, and brin. Thường thì btree và hash là 2 loại index được sử dụng rộng rãi. Các index còn lại được sử dụng cho từng mục đích khác nhau, ví dụ gist và spgist cho kiểu dữ liệu liên quan tới vị trí địa lý, gin cho kiểu dữ liệu text tìm kiếm với dữ liệu lớn, brin được thiết kế để xử lý các bảng lớn, trong đó các cột nhất định có một số tương quan tự nhiên với vị trí thực của chúng trong bảng.

  1. Cú pháp tạo

postgres=# \h create index
Command:     CREATE INDEX
Description: define a new index
Syntax:
CREATE [ UNIQUE ] INDEX [ CONCURRENTLY ] [ [ IF NOT EXISTS ] name ] ON table_name [ USING method ]
    ( { column_name | ( expression ) } [ COLLATE collation ] [ opclass ] [ ASC | DESC ] [ NULLS { FIRST | LAST } ] [, ...] )
    [ WITH ( storage_parameter = value [, ... ] ) ]
    [ TABLESPACE tablespace_name ]
    [ WHERE predicate ]

postgres=#

  1. Ví dụ

postgres=# create index test_nomarl_tbl_idx on test_nomarl_tbl using btree (id);
CREATE INDEX
postgres=# create index test_nomarl_tbl_hash_idx on test_nomarl_tbl using hash (id);
CREATE INDEX
postgres=# \d test_nomarl_tbl
          Table "public.test_nomarl_tbl"
 Column |  Type   | Collation | Nullable | Default
--------+---------+-----------+----------+---------
 id     | integer |           |          |
Indexes:
    "test_nomarl_tbl_hash_idx" hash (id)
    "test_nomarl_tbl_idx" btree (id)
Tablespace: "testtps"

postgres=#

Chi tiết về các loại index xin tìm hiểu ở đây: https://www.postgresql.org/docs/current/static/internals.html

Cách cấu hình setting files trên PostgreSQL

Lời mở đầu

Chào các bạn, chắc hẳn lúc mới đầu sử dụng PostgreSQL bạn đã có lúc tự hỏi phải thiết lập cấu hình từ file cấu hình nào, PostgreSQL có những file cấu hình gì. Làm như thế nào để cấu hình,.. Bài viết này sẽ cố gắng đưa ra cách nhìn tổng quan về setting files, cách thiết lập, và một số point khi thiết lập.

PostgreSQL setting files

Tới phiên bản PostgreSQL 10, PostgreSQL có những file settings như bên dưới.

PostgreSQL 10 có nhiều thay đổi về file name, parameter name,... But may mắn là tên file setting thì không có thay đổi.


DangnoMacBook-Pro:~ bocap$ ll $PGDATA | grep conf
-rw-------   1 bocap  wheel   4469 Nov  1 20:42 pg_hba.conf
-rw-------   1 bocap  wheel   1636 Sep 10 23:19 pg_ident.conf
-rw-------   1 bocap  wheel     88 Sep 10 23:19 postgresql.auto.conf
-rw-------   1 bocap  wheel  22321 Nov  1 20:45 postgresql.conf
DangnoMacBook-Pro:~ bocap$ 

File Setting Mục đích sử dụng Cách phản ảnh
pg_hba.conf File cấu hình xác thực cho PostgreSQL server. Chỉ những host được cấu hình cho phép từ file này mới được phép xác thực tới server. File này cũng cấu hình phương pháp xác thực tới server. Ví dụ: trust(không xác thực password), password(plain text password), md5(xác thực bằng password được hash md5), ident(sử dụng xác thực thông qua OS user), ... reload
pg_ident.conf File cấu hình mapping cho OS user với PostgreSQL trong trong phương pháp xác thực reload
postgresql.auto.conf Được thêm vào PostgreSQL 9.4, file này có nội dung được ghi vào khi thực hiện lệnh ALTER SYSTEM để thay đổi parameters. Khuyến cáo là không nên chỉnh sửa trực tiếp file này. reload, restart
postgresql.conf File cấu hình chính của PostgreSQL Server. reload, restart
recovery.conf sử dụng khi restore dữ liệu từ basebackup hoặc dùng trong cấu hình standby restart

Như trên có 2 cách phản ảnh parameters sau khi đã config(thay đổi giá trị paramter).

  • Reload là cách làm cho các process đọc lại file config mà không làm ảnh hưởng tới Application.

DangnoMacBook-Pro:~ bocap$ pg_ctl reload
server signaled
LOG:  received SIGHUP, reloading configuration files
LOG:  parameter "archive_command" removed from configuration file, reset to default
DangnoMacBook-Pro:~ bocap$ 

  • Restart là hình thức phản ảnh parameters bằng cách khởi động lại server. Cách này làm toàn bộ connections bị disconnect, nên phải khởi động lại Application. Nên nếu không cần thiết thì không dùng cách này.

DangnoMacBook-Pro:~ bocap$ pg_ctl restart 
waiting for server to shut down....LOG:  received fast shutdown request
LOG:  aborting any active transactions
LOG:  autovacuum launcher shutting down
LOG:  shutting down
LOG:  database system is shut down
 done
server stopped
server starting
DangnoMacBook-Pro:~ bocap$ 


pg_hba.conf

File cấu hình này có phản ảnh sau khi config bằng cách reload mà không cần restart server. Đương nhiên là restart thì các parameters này cũng được phản ảnh.


DangnoMacBook-Pro:~ bocap$ grep "^local " $PGDATA/pg_hba.conf
local   all             all                                     md5
DangnoMacBook-Pro:~ bocap$ pg_ctl reload
server signaled
LOG:  received SIGHUP, reloading configuration files
DangnoMacBook-Pro:~ bocap$ psql -c "select 1"
 ?column? 
----------
        1
(1 row)

DangnoMacBook-Pro:~ bocap$ 
DangnoMacBook-Pro:~ bocap$ grep "^local " $PGDATA/pg_hba.conf
local   all             all                                     reject
DangnoMacBook-Pro:~ bocap$ pg_ctl reload
server signaled
LOG:  received SIGHUP, reloading configuration files
DangnoMacBook-Pro:~ bocap$ psql -c "select 1"
FATAL:  pg_hba.conf rejects connection for host "[local]", user "postgres", database "postgres"
psql: FATAL:  pg_hba.conf rejects connection for host "[local]", user "postgres", database "postgres"
DangnoMacBook-Pro:~ bocap$ 

pg_ident.conf

Cũng như pg_hba.conf, nội dung file này cũng được phản ảnh sau khi reload server.

postgresql.auto.conf

Nội dung file này được phản ảnh sau khi reload server, nhưng giống như postgresql.conf có một số paramters chỉ được phản ảnh sau khi restart server. Như ví dụ bên dưới, mình thay đổi 2 parameters log_disconnections và max_connections, but chỉ có log_disconnections là thay đổi được. Còn parameter max_connections thì cần restart server mới thay đổi được.


DangnoMacBook-Pro:~ bocap$ psql
psql (9.6.5)
Type "help" for help.

postgres=#  alter system reset all;
ALTER SYSTEM
postgres=# \! cat $PGDATA/postgresql.auto.conf
# Do not edit this file manually!
# It will be overwritten by ALTER SYSTEM command.
postgres=# show max_connections ;
 max_connections 
-----------------
 20
(1 row)

postgres=# show log_disconnections ;
 log_disconnections 
--------------------
 off
(1 row)

postgres=# alter system set max_connections to 15;
ALTER SYSTEM
postgres=# alter system set log_disconnections to on;
ALTER SYSTEM
postgres=# show log_disconnections ;
 log_disconnections 
--------------------
 off
(1 row)

postgres=# show max_connections ;
 max_connections 
-----------------
 20
(1 row)

postgres=# \q


DangnoMacBook-Pro:~ bocap$ pg_ctl reload
server signaled
LOG:  received SIGHUP, reloading configuration files
LOG:  parameter "max_connections" cannot be changed without restarting the server
LOG:  parameter "log_disconnections" changed to "on"
LOG:  configuration file "/usr/local/pgsql/pg9605/data/postgresql.auto.conf" contains errors; unaffected changes were applied
DangnoMacBook-Pro:~ bocap$ psql
psql (9.6.5)
Type "help" for help.

postgres=# show log_disconnections ;
 log_disconnections 
--------------------
 on
(1 row)

postgres=# show max_connections ;
 max_connections 
-----------------
 20
(1 row)

postgres=# \! cat $PGDATA/postgresql.auto.conf
# Do not edit this file manually!
# It will be overwritten by ALTER SYSTEM command.
max_connections = '15'
log_disconnections = 'on'
postgres=# \q
LOG:  disconnection: session time: 0:00:33.338 user=postgres database=postgres host=[local]
DangnoMacBook-Pro:~ bocap$ 

Parameter max_connections được thay đổi sau khi server restart.


DangnoMacBook-Pro:~ bocap$ pg_ctl restart
waiting for server to shut down....LOG:  received fast shutdown request
LOG:  aborting any active transactions
LOG:  autovacuum launcher shutting down
LOG:  shutting down
LOG:  database system is shut down
 done
server stopped
server starting
DangnoMacBook-Pro:~ bocap$ LOG:  database system was shut down at 2017-11-04 22:53:11 JST
LOG:  MultiXact member wraparound protections are now enabled
LOG:  autovacuum launcher started
LOG:  database system is ready to accept connections

DangnoMacBook-Pro:~ bocap$ psql
psql (9.6.5)
Type "help" for help.

postgres=# show max_connections ;
 max_connections 
-----------------
 15
(1 row)

postgres=# 

postgresql.conf

Giống như postgresql.auto.conf, cách phản của postgresql.conf cũng như vậy.
Ở postgresql.conf và postgresql.auto.conf các parameters dưới đây cần restart server để phản ánh sau khi config.


postgres=# select name,context from pg_settings where context = 'postmaster';
                name                 |  context   
-------------------------------------+------------
 allow_system_table_mods             | postmaster
 archive_mode                        | postmaster
 autovacuum_freeze_max_age           | postmaster
 autovacuum_max_workers              | postmaster
 autovacuum_multixact_freeze_max_age | postmaster
 bonjour                             | postmaster
 bonjour_name                        | postmaster
 cluster_name                        | postmaster
 config_file                         | postmaster
 data_directory                      | postmaster
 dynamic_shared_memory_type          | postmaster
 event_source                        | postmaster
 external_pid_file                   | postmaster
 hba_file                            | postmaster
 hot_standby                         | postmaster
 huge_pages                          | postmaster
 ident_file                          | postmaster
 listen_addresses                    | postmaster
 logging_collector                   | postmaster
 max_connections                     | postmaster
 max_files_per_process               | postmaster
 max_locks_per_transaction           | postmaster
 max_pred_locks_per_transaction      | postmaster
 max_prepared_transactions           | postmaster
 max_replication_slots               | postmaster
 max_wal_senders                     | postmaster
 max_worker_processes                | postmaster
 old_snapshot_threshold              | postmaster
 port                                | postmaster
 shared_buffers                      | postmaster
 shared_preload_libraries            | postmaster
 ssl                                 | postmaster
 ssl_ca_file                         | postmaster
 ssl_cert_file                       | postmaster
 ssl_ciphers                         | postmaster
 ssl_crl_file                        | postmaster
 ssl_ecdh_curve                      | postmaster
 ssl_key_file                        | postmaster
 ssl_prefer_server_ciphers           | postmaster
 superuser_reserved_connections      | postmaster
 track_activity_query_size           | postmaster
 track_commit_timestamp              | postmaster
 unix_socket_directories             | postmaster
 unix_socket_group                   | postmaster
 unix_socket_permissions             | postmaster
 wal_buffers                         | postmaster
 wal_level                           | postmaster
 wal_log_hints                       | postmaster
(48 rows)

recovery.conf

Khi server start nếu thư mục dữ liệu tồn tại file recovery.conf PostgreSQL sẽ đọc file này và thực hiện quá trình recovery như trong file recovery.conf chỉ định.
Ví dụ bên dưới mình tạo một standby và thiết lập recovery.conf để khi standby server khi khởi động trước hết sẽ restore archive log từ "/mnt/archivedir/".


DangnoMacBook-Pro:~ bocap$ pg_basebackup -h localhost -R -x -D $PGDATA.sby
LOG:  disconnection: session time: 0:00:01.258 user=postgres database= host=::1 port=63760
DangnoMacBook-Pro:~ bocap$ echo port=9606 >> $PGDATA.sby/postgresql.conf
DangnoMacBook-Pro:~ bocap$ cat >> $PGDATA.sby/recovery.conf  restore_command = 'cp /mnt/archivedir/%f "%p"'
> EOF
DangnoMacBook-Pro:~ bocap$ pg_ctl start -D $PGDATA.sby
server starting
DangnoMacBook-Pro:~ bocap$ LOG:  database system was interrupted; last known up at 2017-11-04 23:10:05 JST
LOG:  entering standby mode
LOG:  restored log file "00000001000000040000007F" from archive
LOG:  redo starts at 4/7F000060
LOG:  consistent recovery state reached at 4/7F000130
cp: /mnt/archivedir/000000010000000400000080: No such file or directory
LOG:  started streaming WAL from primary at 4/80000000 on timeline 1

DangnoMacBook-Pro:~ bocap$

Backup dữ liệu trên PostgreSQL

Tản mạn: Tối hôm trước làm về sớm, thằng cùng chỗ làm rủ qua quán sashimi thịt ngựa. Không biết ăn thịt but đi ăn cùng cho vui. Nhắm mắt nuốt được vài miếng chấm toàn mù tạc xong tối về đau bụng cả đêm. Đúng là cái gì cũng phải có lửa mới hiệu quả được.
Xin lỗi các bạn thời gian vừa qua blog PostgreSQL Việt Nam hơi thiếu lửa.

Backup dữ liệu trên PostgreSQL

Hôm nay bocap sẽ tái khởi động với bài viết các cách thức backup dữ liệu trên PostgreSQL.
Có một số cách phân but về tổng quan backup trên PostgreSQL được chia làm 2 loại "offline backup", "online backup". Ngoài ra phân loại chi tiết hơn thì có thêm backup vật lý(backup data files) và backup logic(backup dữ liệu qua SQL). Đối với từng loại backup có những đặc điểm tốt xấu riêng. Hãy tìm hiểu và lựa chọn phương pháp phù hợp với môi trường của bạn.

Offline backup

Là hình thức backup dữ liệu khi PostgreSQL Server đã dừng hoạt động. Nên phương pháp này chỉ có thể backup theo phương pháp vật lý.
Sau khi dừng hoạt động từ server (pg_ctl stop -mf), chúng ta copy cả thư mục dữ liệu (database cluster). Nếu có sử dụng tablespace để lưu trữ dữ liệu ngoài thư mục dữ liệu thì phải backup cả những thư mục đó.
Đặc điểm của hình thức backup này.

  • Ảnh hưởng tới hệ thống: Phải stop database trước khi backup.
  • Phạm vi backup: Toàn bộ database cluster.
  • Thời điểm phục hồi khi restore: Thời điểm thực hiện sao lưu.

Chú ý:

  • Nếu database cluster sử dụng tính năng lưu trữ dữ liệu bên ngoài database cluster (tablespace), hoặc lưu trữ WAL ngoài database cluter, khi backup cũng phải backup các đối tượng này.

[bocap@localhost ~]$ pg_ctl stop -mf
waiting for server to shut down.... done
server stopped
[bocap@localhost ~]$ mkdir /mnt/backup/data_`date +"%m-%d-%y"`
[bocap@localhost ~]$ ls -l /mnt/backup/
合計 0
drwxrwxr-x. 2 bocap bocap 6 11月  1 12:50 data_11-01-17
[bocap@localhost ~]$ tar cvfz /mnt/backup/data_11-01-17/data.tar.gz $PGDATA 
[bocap@localhost ~]$ ll  /mnt/backup/data_11-01-17/
合計 130956
-rw-rw-r--. 1 bocap bocap 134096110 11月  1 12:53 data.tar.gz
[bocap@localhost ~]$ 

Online backup

Là hình thức backup dữ liệu khi PostgreSQL vẫn đang hoạt động và cho phép ảnh hưởng tới môi trường Database(ví dụ: ACCESS SHARE lock từ pg_dump hay ảnh hưởng I/O từ backup) của bạn ở một mức độ cho phép.
Hình thức backup này có thể thực hiện bởi cả 2 phương pháp backup vật lý và logic.

Online logic backup

Sử dụng lệnh pg_dump (backup theo đơn vị bảng, schema, .., database), hoặc pg_dumpall (backup toàn bộ dữ liệu của database cluster) để backup dữ liệu. Các câu lệnh này sẽ connect tới PostgreSQL và lấy dữ liệu theo dạng logic (SQL) và lưu trữ dưới dạng text hoặc tar(zip). Các câu lệnh này cũng restore dữ liệu về thời điểm chạy câu lệnh pg_dump/pg_dumpall.
Bắt đầu từ phiên bản PostgreSQL 9.3 pg_dump/pg_restore(9.2~) có thêm chức năng backup/restore dữ liệu song song (sử dụng nhiều connections). Trong những môi trường nhiều CPU và Disk có tính năng tốt có thể sử dụng chức năng này một cách hiệu quả.
Đặc điểm của hình thức backup này.

  • Ảnh hưởng tới hệ thống: Có thể backup khi database đang hoạt động.
  • Phạm vi backup: bảng, schema, ..database hoặc toàn bộ database cluster.
  • Thời điểm phục hồi khi restore: Thời điểm thực hiện sao lưu.

Chú ý:

  • pg_dump/pg_dumpall sẽ lần lượt lock tất cả các đối tượng backup (tables) ở chế độ AccessShareLock, nên cần chú ý khi thực hiện các thao tác có lock xung đột. Tham khảo thêm PostgreSQL Locks
  • Backup với định dạng text có thể restore bằng psql. Ở các định dạng khác, ta restore bằng lệnh pg_restore.
  • Với option -Z, pg_dump có thể nén dữ liệu backup với nhiều mức độ (0-9, mặc định là 6). But khi mức độ nén cao tỷ lệ CPU cũng sẽ cao theo. Nên cân đối hợp lý giữa CPU và dung lượng lưu trữ.

DangnoMacBook-Pro:~ bocap$ psql -c "select * from testtbl"
 id 
----
  1
(1 row)

DangnoMacBook-Pro:~ bocap$ pg_dump --table testtbl -f /tmp/testdump
DangnoMacBook-Pro:~ bocap$ cat /tmp/testdump | grep -v -e SET -e "\-" -e "^$"
CREATE TABLE testtbl (
    id integer
);
ALTER TABLE testtbl OWNER TO postgres;
COPY testtbl (id) FROM stdin;
1
\.
DangnoMacBook-Pro:~ bocap$ 

Online backup vật lý

Là cách tạo 1 basebackup (sử dụng lệnh pg_basebackup hoặc function pg_start_backup/pg_stop_backup) kết hợp với việc xuất archive log (transaction log được lưu trữ thông qua parameter archive_command). Khi restore ta tạo file recovery.conf trong thư mục data (basebackup), điền nội dung restore WAL từ đâu (parameter restore_command) sau đó khởi động database từ thư mục basebackup.
Dữ liệu backup sẽ được phục hồi tới thời điểm archive_command chạy lần cuối cùng (lệnh chỉ định trong archive_command sẽ được chạy khi dung lượng transaction đủ 16MB, hoặc quá thời gian chỉ định trong archive_timeout từ lần archive trước).
Đặc điểm của hình thức backup này.

  • Ảnh hưởng tới hệ thống: Có thể backup khi database đang hoạt động.
  • Phạm vi backup: bảng, schema, ..database hoặc toàn bộ database cluster.
  • Thời điểm phục hồi khi restore: Thời điểm thực hiện sao lưu.

Chú ý:

  • Xử lý tạo một basebackup giống như copy hoàn toàn một database cluster. Nên nếu dữ liệu lớn sẽ mất nhiều thời gian.
  • Khi pg_basebackup chạy lệnh này sẽ thực hiện một CHECKPOINT, mặc định CHECKPOINT này chạy ở chế độ chậm spread (có thể chậm hơn so với thông thường = checkpoint_completion_target * checkpoint_timeout = 2.5 phút). Nên cất nhắc chạy ở chế độ nhanh (-c fast) nếu muốn pg_basebackup diễn ra nhanh hơn. But cũng nên chú ý workload lớn khi CHECKPOINT nhanh có thể ảnh hưởng tới hệ thống database.
  • pg_basebackup mặc định không copy WAL (transaction log) sinh ra trong lúc chạy lệnh. Sử dụng option -x nếu muốn tạo một pg_basebackup sử dụng trong cấu hình replication.

DangnoMacBook-Pro:~ bocap$ grep replication $PGDATA/pg_hba.conf | grep -v "#"
host    replication     postgres        127.0.0.1/32            trust
host    replication     postgres        ::1/128                 trust
DangnoMacBook-Pro:~ bocap$ grep -e max_wal_senders -e wal_level -e archive_ $PGDATA/postgresql.conf
wal_level = replica			# minimal, replica, or logical
archive_mode = on		# enables archiving; off, on, or always
archive_command = 'test ! -f /mnt/archivedir/%f && cp %p /mnt/archivedir/%f'
archive_timeout = 30s		# force a logfile segment switch after this
max_wal_senders = 10		# max number of walsender processes
#max_standby_archive_delay = 30s	# max delay before canceling queries
DangnoMacBook-Pro:~ bocap$ ll /mnt/archivedir/
DangnoMacBook-Pro:~ bocap$ ll /mnt/data
DangnoMacBook-Pro:~ bocap$ pg_basebackup -D /mnt/data -h localhost
NOTICE:  pg_stop_backup complete, all required WAL segments have been archived
DangnoMacBook-Pro:~ bocap$ ll /mnt/data 
total 96
-rw-------   1 bocap  wheel      4 Nov  1 20:45 PG_VERSION
-rw-------   1 bocap  wheel    208 Nov  1 20:45 backup_label
drwx------   5 bocap  wheel    170 Nov  1 20:45 base
drwx------  56 bocap  wheel   1904 Nov  1 20:45 global
drwx------   3 bocap  wheel    102 Nov  1 20:45 pg_clog
drwx------   2 bocap  wheel     68 Nov  1 20:45 pg_commit_ts
drwx------   2 bocap  wheel     68 Nov  1 20:45 pg_dynshmem
-rw-------   1 bocap  wheel   4469 Nov  1 20:45 pg_hba.conf
-rw-------   1 bocap  wheel   1636 Nov  1 20:45 pg_ident.conf
drwx------   4 bocap  wheel    136 Nov  1 20:45 pg_logical
drwx------   4 bocap  wheel    136 Nov  1 20:45 pg_multixact
drwx------   3 bocap  wheel    102 Nov  1 20:45 pg_notify
drwx------   2 bocap  wheel     68 Nov  1 20:45 pg_replslot
drwx------   2 bocap  wheel     68 Nov  1 20:45 pg_serial
drwx------   2 bocap  wheel     68 Nov  1 20:45 pg_snapshots
drwx------   2 bocap  wheel     68 Nov  1 20:45 pg_stat
drwx------   2 bocap  wheel     68 Nov  1 20:45 pg_stat_tmp
drwx------   3 bocap  wheel    102 Nov  1 20:45 pg_subtrans
drwx------   2 bocap  wheel     68 Nov  1 20:45 pg_tblspc
drwx------   2 bocap  wheel     68 Nov  1 20:45 pg_twophase
drwx------   3 bocap  wheel    102 Nov  1 20:45 pg_xlog
-rw-------   1 bocap  wheel     88 Nov  1 20:45 postgresql.auto.conf
-rw-------   1 bocap  wheel  22320 Nov  1 20:45 postgresql.conf
DangnoMacBook-Pro:~ bocap$ ll /mnt/archivedir/
total 65544
-rw-------  1 bocap  wheel  16777216 Nov  1 20:45 000000010000000000000014
-rw-------  1 bocap  wheel  16777216 Nov  1 20:45 000000010000000000000015
-rw-------  1 bocap  wheel       305 Nov  1 20:45 000000010000000000000015.00000028.backup
DangnoMacBook-Pro:~ bocap$ 

Một số lưu ý khi backup

Khi backup, đối với từng hệ thống khác nhau, sẽ có những yêu cầu khác nhau. Thường khi backup users cần để ý tới những quan điểm bên dưới để đối ứng với yêu cầu hệ thống.

  • Cần restore dữ liệu về thời điểm nào.
    Ví dụ: Khi hệ thống bị trouble, muốn restore về thời điểm gần nhất thì nên sử dụng phương pháp Online backup vật lý.
  • Dung lượng dữ liệu backup.
    Ví dụ: Cần backup dữ liệu với dung lượng thấp thì nên sử dụng Online logic backup
  • Mức độ ảnh hưởng tới hệ thống.
    Ví dụ: Tính năng ổ cứng không tốt, không muốn xuất archive log để giảm Disk I/O thì không nên sử dụng phương pháp Online backup vật lý.  

Cấu trúc thư mục dữ liệu PostgreSQL

Thư mục dữ liệu PostgreSQL

Để chạy một câu lệnh SQL, tạo bảng dữ liệu, hay lưu trữ dữ liệu PostgreSQL cũng như các RDBMS khác chúng ta cần một thư mục chứa dữ liệu, PostgreSQL gọi đó là database cluster. Sau khi cài đặt PostgreSQL, database cluster được tạo ra bởi lệnh initdb. Nếu bạn cài đặt qua installer trên Windows, database cluster sẽ tự động được tạo ra trong quá trình cài đặt. Sau khi tạo một database cluster, ta có thể khởi động database cluster này lên và thực hiện các câu truy vấn tuỳ ý.

Các database cluster phân biệt bởi parameter port (postgresql.conf). Ta có thể cài đặt nhiều database cluster trên một hệ điều hành bằng cách đặt port khác nhau cho mỗi database cluster.

Tạo thư mục dữ liệu

Để tạo một thư mục dữ liệu PostgreSQL (database cluster) ta sử dụng câu lệnh initdb.


DangnoMacBook-Pro:postgresql-9.6.5 bocap$ initdb --no-locale -E utf8 -D /usr/local/pgsql/pg9600/data
The files belonging to this database system will be owned by user "bocap".
This user must also own the server process.

The database cluster will be initialized with locale "C".
The default text search configuration will be set to "english".

Data page checksums are disabled.

creating directory /usr/local/pgsql/pg9600/data ... ok
creating subdirectories ... ok
selecting default max_connections ... 100
selecting default shared_buffers ... 128MB
selecting dynamic shared memory implementation ... posix
creating configuration files ... ok
running bootstrap script ... ok
performing post-bootstrap initialization ... ok
syncing data to disk ... ok

WARNING: enabling "trust" authentication for local connections
You can change this by editing pg_hba.conf or using the option -A, or
--auth-local and --auth-host, the next time you run initdb.

Success. You can now start the database server using:

    pg_ctl -D /usr/local/pgsql/pg9600/data -l logfile start

DangnoMacBook-Pro:postgresql-9.6.5 bocap$ 

Lệnh initdb nhiều options bạn có thể kiểm tra bằng option --help. Ví dụ trên mình sử dụng các options thông dụng như bên dưới.

  • --no-locale: Không sử dụng locale, hay locale C. Tạo database cluster với option này, khi sắp xếp dữ liệu (ORDER BY), PostgreSQL sẽ không so sánh qua ký tự alphabet mà so sánh trực tiếp qua character code, tăng performance.
  • -E hay --encoding: Chỉ định encoding cho database cluster.
  • -D: thư mục cơ sở dữ liệu.

Khởi động server từ thư mục dữ liệu đã tạo.Ví dụ dưới mình sử dụng port 9605 cho database cluster này.


DangnoMacBook-Pro:postgresql-9.6.5 bocap$ echo port=9605 >> /usr/local/pgsql/pg9600/data/postgresql.conf
DangnoMacBook-Pro:postgresql-9.6.5 bocap$ pg_ctl start
server starting
DangnoMacBook-Pro:postgresql-9.6.5 bocap$ LOG:  database system was shut down at 2017-09-10 23:19:54 JST
LOG:  MultiXact member wraparound protections are now enabled
LOG:  autovacuum launcher started
LOG:  database system is ready to accept connections

Kiểm tra kết nối. Nếu không chỉ định User khi tạo database cluster (tùy chọn -U cho initdb). Mặc định User được tạo ra cho database cluster  là User của OS chạy câu lệnh initdb, nên ví dụ dưới mình tạo lại user postgres cho database cluster (mình để mặc định biến môi trường PGUSER là 'postgres' nên có lỗi User không tồn tại khi truy nhập).


DangnoMacBook-Pro:postgresql-9.6.5 bocap$ psql
FATAL:  role "postgres" does not exist
psql: FATAL:  role "postgres" does not exist
DangnoMacBook-Pro:postgresql-9.6.5 bocap$ psql -U bocap -c "create user postgres password 'postgres'"
CREATE ROLE
DangnoMacBook-Pro:postgresql-9.6.5 bocap$ psql
psql (9.6.5)
Type "help" for help.

postgres=> \q
DangnoMacBook-Pro:postgresql-9.6.5 bocap$


Cấu trúc thư mục PostgreSQL

Sau khi khởi động PostgreSQL 1 database cluster sẽ có cấu trúc như bên dưới.

Phiên bản PostgreSQL-10 sắp tới sẽ hơi khác ví dụ thư mục log pg_log (khi thiết lập lưu trữ log logging_colector = on) sẽ trở thành log, thư mục transaction log pg_xlog sẽ trở thành pg_wal, etc.


DangnoMacBook-Pro:postgresql-9.6.5 bocap$ ll $PGDATA
total 104
-rw-------   1 bocap  wheel      4 Sep 10 23:19 PG_VERSION
drwx------   5 bocap  wheel    170 Sep 10 23:19 base
drwx------  55 bocap  wheel   1870 Sep 10 23:31 global
drwx------   3 bocap  wheel    102 Sep 10 23:19 pg_clog
drwx------   2 bocap  wheel     68 Sep 10 23:19 pg_commit_ts
drwx------   2 bocap  wheel     68 Sep 10 23:19 pg_dynshmem
-rw-------   1 bocap  wheel   4477 Sep 10 23:19 pg_hba.conf
-rw-------   1 bocap  wheel   1636 Sep 10 23:19 pg_ident.conf
drwx------   4 bocap  wheel    136 Sep 10 23:19 pg_logical
drwx------   4 bocap  wheel    136 Sep 10 23:19 pg_multixact
drwx------   3 bocap  wheel    102 Sep 10 23:31 pg_notify
drwx------   2 bocap  wheel     68 Sep 10 23:19 pg_replslot
drwx------   2 bocap  wheel     68 Sep 10 23:19 pg_serial
drwx------   2 bocap  wheel     68 Sep 10 23:19 pg_snapshots
drwx------   2 bocap  wheel     68 Sep 10 23:31 pg_stat
drwx------   4 bocap  wheel    136 Sep 10 23:31 pg_stat_tmp
drwx------   3 bocap  wheel    102 Sep 10 23:19 pg_subtrans
drwx------   2 bocap  wheel     68 Sep 10 23:19 pg_tblspc
drwx------   2 bocap  wheel     68 Sep 10 23:19 pg_twophase
drwx------   4 bocap  wheel    136 Sep 10 23:19 pg_xlog
-rw-------   1 bocap  wheel     88 Sep 10 23:19 postgresql.auto.conf
-rw-------   1 bocap  wheel  22267 Sep 10 23:20 postgresql.conf
-rw-------   1 bocap  wheel     37 Sep 10 23:31 postmaster.opts
-rw-------   1 bocap  wheel     86 Sep 10 23:31 postmaster.pid
DangnoMacBook-Pro:postgresql-9.6.5 bocap$ 

Nội dung các files trong 1 thư mục dữ liệu PostgreSQL (PGDATA)

Folder/files Nội dung
PG_VERSION

File chứa nội dung phiên bản PostgreSQL hiện tại
ví dụ:


DangnoMacBook-Pro:postgresql-9.6.5 bocap$ cat $PGDATA/PG_VERSION
9.6

base Thư mục con chứa dữ liệu của các database trong database cluster. Trong thư mục này chứa các thư mục con nữa cho mỗi database. Tên thư mục đặt theo oid của database tương ứng.

ví dụ:


DangnoMacBook-Pro:postgresql-9.6.5 bocap$ ll $PGDATA/base
total 0
drwx------  270 bocap  wheel  9180 Sep 10 23:19 1
drwx------  270 bocap  wheel  9180 Sep 10 23:19 12668
drwx------  271 bocap  wheel  9214 Sep 10 23:32 12669
DangnoMacBook-Pro:postgresql-9.6.5 bocap$ psql
psql (9.6.5)
Type "help" for help.

postgres=>; select oid, datname from pg_database;
  oid  |  datname  
-------+-----------
 12669 | postgres
     1 | template1
 12668 | template0
(3 rows)

postgres=>; 

global Thư mục con chứa các bảng sử dụng nội bộ trong PostgreSQL (system catalog). Ví dụ như catalog chứa thông tin về database pg_database.
pg_commit_ts Thư mục con chứa thông tin về trạng thái commit của dữ liệu timestamp.
pg_clog Thư mục con chứa thông tin về trạng thái commit của transaction trên database cluster hiện tại. Mỗi bit dữ liệu chứa thông tin trạng thái cho một transaction. offset của file trong thư mục này tương ứng với transaction ID, vì vậy PostgreSQL có thể xem thông tin trạng thái transaction thông qua offset đó.
pg_dynshmem Thư mục con chứa các file sử dụng dynamic shared memory.
pg_logical Thư mục con chứa trạng thái dữ liệu sử dụng trong chức năng logical decoding (chức năng decoding dữ liệu từ WAL).
pg_multixact Thư mục con chứa dữ liệu trạng thái multitransaction (sử dụng cho locks mức độ dòng dữ liệu).
pg_notify Thư mục con chứa dữ liệu về chức năng LISTEN/NOTIFY.
pg_replslot Thư mục con chứa dữ liệu về replication slot
pg_serial Thư mục con chứa thông tin về các transaction commited ở mức độ phân li serializable.
pg_snapshots Thư mục con chứa thông tin về các snapshots đã xuất.
pg_stat Thư mục con chứa các files thông tin thống kê về PostgreSQL đang được sử dụng hiện tại.
pg_stat_tmp Thư mục con chứa các files thông tin thống kê về PostgreSQL tạm thời, chưa được đưa vào sử dụng.
pg_subtrans Thư mục con chứa dữ liệu về các subtransaction (khi sử dụng SAVEPOINT).
pg_tblspc Thư mục con chứa thông tin symbolic links tới các tablespaces. khi tạo 1 TABLESPACE để chứa dữ liệu bên ngoài database cluster, PostgreSQL sẽ tạo một symbolic links tới thư mục tạo từ TABLESPACE trong thư mục này.
pg_twophase Thư mục con chứa các tập tin trạng thái cho các prepared transactions.
pg_xlog Thư mục con chứa thông tin về WAL files. Phiên bản PostgreSQL 10, thư mục này chuyển thành pg_wal.
postgresql.auto.conf File chứa thông tin về các cấu hình tham số thiết lập bởi lệnh ALTER SYSTEM.
postmaster.opts A file recording the command-line options the server was last started with. File này chứa thông tin về các tuỳ chọn lần cuối của lệnh khởi động PostgreSQL.
ví dụ: 

DangnoMacBook-Pro:postgresql-9.6.5 bocap$ cat /usr/local/pgsql/pg9600/data/postmaster.opts 
/usr/local/pgsql/pg9600/bin/postgres

postmaster.pid File này tạo ra khi khởi động PostgreSQL và mất đi khi shutdown PostgreSQL. File chứa thông tin về PID của postmaster process, đường dẫn thư mục dữ liệu, thời gian khởi động, số hiệu port, đường dẫn Unix-domain socket (là trống trên môi trường Windows), giá trị hiệu lực đầu tiên chỉ định trong tham số listen_address và segment ID shared memory (tạo lúc khởi động PostgreSQL).

VACUUM

VACUUM và chức năng autovacuum

Tại sao PostgreSQL cần VACUUM ?

  1. Dung lượng đĩa cứng có thể full
    Khác với các RDBMS khác (như MySQL), khi người dùng chạy lệnh DELETE hay UPDATE, PostgreSQL không xoá dữ liệu cũ đi luôn mà chỉ đánh dấu "đó là dữ liệu đã bị xoá".
    Nên nếu liên tục INSERT/DELETE hoặc UPDATE dữ liệu mà không có cơ chế xoá dữ liệu dư thừa thì dung lượng ổ cứng tăng dẫn đến full.

  2. Lỗi (dữ liệu bị vô hiệu) khi Wraparound Transaction ID
    PostgreSQL sử dụng 32 bit Transaction ID (XID) để quản lý transaction(1). Mỗi một record dữ liệu đều có thông tin về XID. Khi dữ liệu được tham chiếu PostgreSQL sử dụng thông tin XID này so sánh với XID hiện tại để đánh giá dữ liệu này có hữu hiệu không. Dữ liệu đang tham chiếu có XID lớn hơn XID hiện tại là dữ liệu không hữu hiệu. Khi sử dụng hết 32 bit XID (khoảng 4 tỷ transactions), để sử dụng tiếp XID sẽ được reset về ban đầu (0). Nếu không có cơ chế chỉnh lại XID trong data thì mỗi lần reset XID, dữ liệu hiện tại sẽ trống trơn (dữ liệu hiện tại luôn có XID lớn hơn XID đã reset (0)).

Một trong những chức năng của VACUUM là quyết những vấn đề như trên.

(1) transaction(Giao dịch cơ sở dữ liệu): Định nghĩa từ wikipedia: Giao dịch cơ sở dữ liệu (database transaction) là đơn vị tương tác của một hệ quản lý cơ sở dữ liệu hoặc các hệ tương tự, mỗi giao dịch được xử lý một cách nhất quán và tin cậy mà không phụ thuộc vào các giao dịch khác. Một hệ cơ sở dữ liệu lý tưởng sẽ phải bảo đảm toàn bộ các tính chất ACID cho mỗi giao dịch. Trên thực tế, các tính chất này thường được nới lỏng để giúp việc thực thi đạt hiệu quả hơn.

PostgreSQL không thực hiện xóa dữ liệu ngay sau khi DELETE hoặc UPDATE nhằm giải quyết vấn đề cùng một lúc nhiều người sử dụng truy cập một vùng dữ liệu (PostgreSQL gọi cơ chế đó là Multiversion Concurrency Control hay MVCC). Theo thông tin gần đây từ cộng đồng PostgreSQL, từ phiên bản 12(?) PostgreSQL có thể bỏ chức năng VACUUM nhờ sử dụng cơ chế lưu trữ zheap.

VACUUM thực hiện những công việc gì

  • Lấy lại dữ liệu dư thừa để tái sử dụng
  • Cập nhật thông tin thống kê (statistics)
  • Giải quyết vấn đề dữ liệu bị vô hiệu khi Wraparound Transaction ID

Lấy lại dữ liệu dư thừa

Như trên, PostgreSQL chưa xoá dữ liệu cũ khi thực hiện thao tác DELETE/UPDATE. Khi VACUUM, những dữ liệu dư thừa đó sẽ được lấy lại và vị trí dư thừa sẽ được cập nhật lại trong bảng vị trí trống (Free Space Map(FSM)). Ngoài ra những block dữ liệu đã được VACUUM sẽ được đánh dấu là đã VACUUM trên bảng khả thị (Visibility Map(VM)), khi UPDATE/DELETE dữ bảng khả thị sẽ cập nhật lại trạng thái là cần VACUUM.

Free Space Map(FSM): Mỗi bảng dữ liệu (hoặc index) tồn tại tương ứng một FSM. FSM chứa thông tin các vị trí trống trong file dữ liệu. Khi dữ liệu mới được ghi PostgreSQL sẽ nhìn vị trí trống từ FSM trước, việc này giảm thiểu truy cập trực tiếp (sinh I/O disk) vào file dữ liệu. File FSM nằm cùng vị trí với file dữ liệu và có tên = file_dữ_liệu_fsm (như ví dụ dưới).
Visibility Map(VM): Mỗi bảng dữ liệu tồn tại tương ứng một visibility map (VM). Một block dữ liệu tương ứng với 1 bit trên VM. VACUUM xem trước thông tin VM của bảng dữ liệu, và chỉ thực hiện trên những block cần được VACUUM. File VM nằm cùng vị trí với file dữ liệu và có tên = file_dữ_liệu_vm (như ví dụ dưới).


testdb=# create table testtbl(id integer);
CREATE TABLE
testdb=# insert into testtbl select generate_series(1,100);
INSERT 0 100
testdb=# delete from testtbl where id < 90;
DELETE 89
testdb=# checkpoint;
CHECKPOINT
testdb=# \! ls -l $PGDATA/base/16384/24576*
-rw------- 1 bocap staff 8192 Jun 24 18:19 /Users/bocap/Downloads/pg94/data/base/16384/24576
-rw------- 1 bocap staff 24576 Jun 24 18:19 /Users/bocap/Downloads/pg94/data/base/16384/24576_fsm
-rw------- 1 bocap staff 8192 Jun 24 18:19 /Users/bocap/Downloads/pg94/data/base/16384/24576_vm

Cập nhật lại thông tin thống kê

Một số bạn lầm tưởng rằng chỉ có chức năng ANALYZE mới cập nhật lại thông tin thống kê dùng bởi planner, nhưng thực tế VACUUM cũng cập nhật thông tin này. Cụ thể là relpages và reltuples trong system catalog pg_class. Do vậy nên có thể nói VACUUM cũng ảnh hưởng tới việc chọn plan thực thi.


postgres=# select relpages,reltuples from pg_class where relname = 'testtbl';
 relpages | reltuples 
----------+-----------
        0 |         0
(1 row)

postgres=# insert into testtbl select generate_series(1,10),random()::text;
INSERT 0 10
postgres=# select relpages,reltuples from pg_class where relname = 'testtbl';
 relpages | reltuples 
----------+-----------
        0 |         0
(1 row)

postgres=# vacuum testtbl;
VACUUM
postgres=# select relpages,reltuples from pg_class where relname = 'testtbl';
 relpages | reltuples 
----------+-----------
        1 |        10
(1 row)

autovacuum

autovacuum là chức năng tự động thực thi VACUUM hoặc ANALYZE khi cần thiết. Chức năng này hoạt động khi tham số autovacuumtrack_counts thiết lập là on. Cả 2 tham số này đều mặc định là on nên autovacuum sẽ tự động hoạt động khi khởi động PostgreSQL. Khi tham số autovacuum là on. Sau khi khởi động PostgreSQL process "autovacuum launcher process" sẽ đảm nhận việc này.


BocapnoMacBook-Pro:postgres bocap$ ps -ef | grep autovacuum | grep  -v grep
501  3169  3164   0 13Aug17 ??         0:03.13 postgres: autovacuum launcher process


Launcher process cứ mỗi autovacuum_naptime sẽ kiểm tra thông tin thống kê, nếu thấy bảng nào cần thiết VACUUM hoặc ANALYZE, launcher process sẽ khởi động các worker processes để thực hiện việc VACUUM hoặc ANALYZE. Số lượng process autovacuum worker hoạt động trong cùng một thời điểm được giới hạn bởi tham số autovacuum_max_workers (mặc định là 3).


BocapnoMacBook-Pro:postgres bocap$ ps -ef | grep autovacuum | grep  -v grep
  501 26490 26484   0  1:14AM ??         0:00.01 postgres: autovacuum launcher process   
  501 26618 26484   0  1:16AM ??         0:00.03 postgres: autovacuum worker process   postgres

Điều kiện cần thiết cho bảng được VACUUM hoặc ANALYZE bởi autovacuum như bên dưới.

Ví dụ: số lượng dòng là 1000, thì mặc định khi số dòng bị xoá hoặc update lớn hơn 0.2*1000 + 50 = 250 bảng sẽ tự động được VACUUM

Ví dụ: số lượng dòng là 1000, thì mặc định khi số dòng bị xoá, update hoặc insert lớn hơn 0.1*1000 + 50 = 250 bảng sẽ tự động được ANALYZE

Khi chạy một câu truy vấn, thông tin thống kê cần phải chính xác để planner chọn đúng plan tối ưu nhất. autovacuum thực thi việc cập nhật thông tin này, nhưng vì một số lý do nào đó (ví dụ: đối tượng bảng đang bị lock trong transaction khác) , autovacuum không thực thi được tốt. Vì vậy, khi thấy câu truy vấn chạy chậm, nên kiểm tra thông tin thống kê xem ANALYZE, VACUUM đã được thực hiện tốt chưa thông qua view pg_stat_all_tables, và thực hiện  VACUUM ANALYZE  cũng là một giải pháp

Ngoài ra để  process autovacuum không ảnh hưởng tới hệ thống, việc thiết lập autovacuum = off và chạy VACUUM ANALYZE thủ công vào thời điểm thích hợp cũng được sử dụng nhiều

Giám sát hoạt động autovacuum

Để biết đối tượng bảng có được VACUUM, ANALYZE hợp lý không ta có thể xem thông qua view pg_stat_all_tables.

-- ví dụ bên dưới cho thấy bảng testtbl đã được:
-- vacuum thủ công vào lúc: 2017-08-26 23:50:28
-- autovacuum vào lúc: 2017-08-27 01:16:04 
-- autoanalyze vào lúc: 2017-08-27 01:16:04

postgres=# select last_vacuum,last_autovacuum,last_analyze,last_autoanalyze from pg_stat_all_tables where relid = (select oid from pg_class where relname = 'testtbl');
          last_vacuum          |        last_autovacuum        | last_analyze |       last_autoanalyze        
-------------------------------+-------------------------------+--------------+-------------------------------
 2017-08-26 23:50:28.025241+09 | 2017-08-27 01:16:04.664297+09 |              | 2017-08-27 01:16:04.665366+09
(1 row)

Ngoài ra, ta có thể theo dõi tình trạng hoạt động của autovacuum thông qua việc thiết lập tham số log_autovacuum_min_duration = 0 (log tất cả các hoạt động autovacuum).

Ví dụ:


2017-08-27 01:16:04.664 JST [26618] LOG:  automatic vacuum of table "postgres.public.testtbl": index scans: 0
	pages: 1276 removed, 0 remain, 0 skipped due to pins, 0 skipped frozen
	tuples: 100000 removed, 0 remain, 0 are dead but not yet removable, oldest xmin: 579
	buffer usage: 3851 hits, 0 misses, 0 dirtied
	avg read rate: 0.000 MB/s, avg write rate: 0.000 MB/s
	system usage: CPU: user: 0.02 s, system: 0.00 s, elapsed: 0.28 s
2017-08-27 01:16:04.665 JST [26618] LOG:  automatic analyze of table "postgres.public.testtbl" system usage: CPU: user: 0.00 s, system: 0.00 s, elapsed: 0.00 s


Trang

Đăng kí nhận RSS - Quản lý vận hành